
Reverse Oscilloscope
31 Dec 2013Progress: Work-in-progress
The Reverse Oscilloscope is a browser based audio synthesizer.
Click here for the stable version (April 2014)
Click here for instructions how to use it
Although it technically works in Firefox, Chrome has much, much lower latency.Recent Updates
2015 version (beta). A few bugfixes and a few half-finished features, but the biggest difference is the interface was reshuffled to better fit with my midi interceptor.
July 2015: Support for NPAPI extensions in Chrome has ended, which is pretty much a death knell for the Jazz plugin. You can still enable it with the #enable-npapi flag but even this will be pulled shortly.
Fortunately, the Web Midi API seems to be getting a foothold and I have bolted on support for it. A complete rewrite of the Reverse Oscilloscope is long overdue.
Fortunately, the Web Midi API seems to be getting a foothold and I have bolted on support for it. A complete rewrite of the Reverse Oscilloscope is long overdue.
September 2014:
Antialiasing/rendering algorithm select box
Stopped caching transition times
ChangeRes now preserves all settings
Channel aftertouch on CC132
Waveshaper Rendering tool
Limited support for touch events
Checkboxes controllable over Midi CC
Forwards oscillocope supports XY mode (set timebase to 0)
August 2014:
toggle waveshaper polyphony, fifthify button.
April 2014:
Added oscillator keyframe staggering
Added dry signal to audio input
Slightly optimized sliders, slider smoothing
Added phaseslider, Rephase
Added Normalize button
Added Audio Input
Added Reverse Spectrum tools and Brushsize slider
Added numerous new 'filters' (actually they're waveshapers) including distortion
Added Arpeggiator, Sequencer
Significantly reduced the Nyquist aliasing (without upsampling - can you guess how I did it?)
Added Frame Detune
Added Clipping tool, Brush tool, Smudge tool, Stretch tool
Save Patch now keeps a snapshot of channel status (modulation, portamento, etc)
Added Drawbar input
Added spectrum, spectrogram visualisations
More reverb controls
Finally added option to scatter chorus phase / modulation speed
Added more controls to keyboard input for those who are too lazy to install Jazz / VMPK
Added noise button
Credit Where Due
Live midi input would not be possible without the Jazz PluginI saved an awful lot of time by lifting a significant amount of code from (an old version of?) jasmid
The reverb and filter algorithms are modified versions of Almer Thie's reverb from corbanbrook's DSP.js
Advisory Warning
The source code is a mess! Do not inspect if you are of a nervous disposition.I do hope the author of jasmid never finds out how much I've butchered his code...
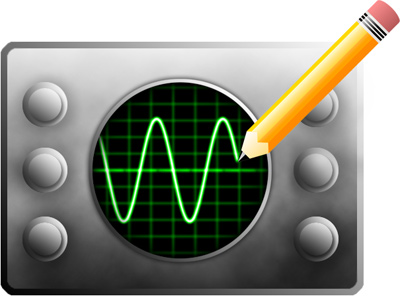
Artist's impression
What is a Reverse Oscilloscope?
An oscilloscope takes a signal (e.g. sound) and draws a shape that represents it.In my reverse oscilloscope, you draw a shape and it creates a sound wave.
Why?
Electronic music synthesis is divided into several key areas. Moogs use Subtractive Synthesis: selecting a harmonic rich waveform (e.g. a sawtooth) and filtering it until you have the sound you want. There are usually only two or three oscillator shapes to choose from. Other common types of synthesis are Additive, FM, and Wavetable synthesis. Wavetable is probably the closest, but still quite a different method, to the Reverse Oscilloscope. But long story short, the Reverse Oscilloscope seemed to be a completely new form of synthesis.The Idea
I first dreamt of a Reverse Oscilloscope many years ago. Having stared at all kinds of music on an oscilloscope screen, I figured that if one became familiar enough with these shapes, one could have a unique advantage in music synthesis. (This was partly based on a slight misconception about the nature of time-domain representation of a signal.)I forgot about it, but it came back to me when I was given an old oscilloscope. I tried to make a reverse oscilloscope using windows audio and C++, but had very little success. I forgot about it again.
Everything changed when one day, Google made a tribute to Robert Moog. This was my first exposure to the HTML5 Audio API. That same afternoon, I had crafted my first prototype of the Reverse Oscilloscope.
Version 1
...was simply a corruption of the 'make a sine wave' audio API example, replacing the sinewave with a canvas draw element. The thrill! I quickly added a qwerty-based frequency input, and then a little playback mechanism. Then I had planned to write a midi interpreter from scratch. I wanted to use the HTML5 File API to read a midi file and play it. (I even considered writing a server and using OSC to send midi packets to the browser - long before I knew about the Jazz Plugin of course.)The discovery of jasmid was incredible. I had thought the odds of someone having already written a midi interpreter in Javascript were so close to zero that I hadn't even searched for it. Pah! I immediately abandoned the prototype and hacked the canvas-wave-drawing into jasmid.
Click here to see the embarrassing first version of the 'scope. Drag and drop a midi file onto the window to play. It should give you a feel for it, and also some idea of the limitations.
I was so happy to have a working example, and so quickly too - less than 24 hours after discovering the Audio API, compared to the weeks I had spent on that first C++ version!
You may notice I added a drum kit patch. This was supposed to emulate the gameboy drumkit. In fact it was more inspired by the Gashisoft drumkit, which I just scoped and drew approximations for quite inaccurately. It does the job though, and I never got round to improving it. It was only to stop the horrid sound of a drumbeat being interpreted as pitch instructions.
Version 2, 3, 4, ...
The state of the 'scope on day 3 of the project: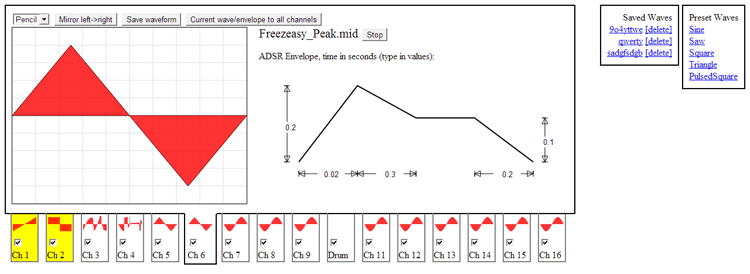
I added many 'stock' waveforms, and even planned to import all of Gashisoft's waveform thumbnails. So as to improve playback of an ordinary midi file, I created a 16-channel version of the 'scope. This just multiplied everything by 16, using tabs and thumbnails to give each channel a separate control, mute, etc. While this worked perfectly, I quickly realized this was not the way I should be going - this is a huge amount of overhead for no actual improvement in the sound. I wanted to build a synthesizer I can use, and that probably means rendering tracks individually anyway.
Another quick point: at some point, I don't remember when, I fixed a small glitch in jasmid. The ADSR would give a click if a note was very short. I eventually found the reason: If the note-off was called while still in the attack region, the amplitude would jump to the sustain value. Fixing that actually made an enormous improvement to the sound when playing sine or triangle waves.
I don't remember exactly how many different directions I ventured. Probably one of the more satisfying (but useless) versions was the glitchtacular FFTScope. Pretty much identical to the earlier versions, but with realtime Fourier analysis!
The limitations
So what were the limitations in my sound? The most obvious thing of all was the uniformity of the waveform throughout each note. Usually in synthesis we modulate a note in three main ways: Frequency Modulation (vibrato), Amplitude Modulation (tremolo) and the slightly elusive Filter Modulation. Changes in timbre throughout a note are vitally important. Specifically, the very beginning of a note plays a huge part in our brain's determination of what instrument is playing. For instance, a flute sounds like a flute - but without the 'chuff' at the beginning, it's a very clean, uniform waveform that's produced, and quite difficult to identify.So how could I change waveform throughout the duration of a note? My idea was to use keyframes. Drawing two waveshapes, the note would begin with one and tween into the other over the course of a second or so. In the next version I extended this to be an unlimited number of frames with individual timings. I also tried to add pitch-dependency to the timings and a few other things.
From then on, I just kept adding things. The biggest leap was adding Jazz Plugin support so I could play with a real keyboard. Note that due to latency issues, this is only viable in chrome. Almost all of the features of progressive versions from this point on are included in the latest version so there's not really much point in me explaining them here - see below for more.
One thing I added early on, because at the time firefox didn't support slider inputs natively, was a custom slider in js. As is usual for little things I make from scratch, I tried to make it reasonably small and efficient. It also became useful for using midi CC messages to control the inputs.
I also wrote a custom RIFF .wav file interpreter / generator for the sake of this project, which wasn't too hard once the endian-ness was understood.
Why didn't I release this sooner?
Partly because it was excitedly hacked together with complete disregard for code clarity. Partly because for a while I naively thought that I might be the only person to have thought of this. Partly because the whole thing always generates a stream of comments like "why didn't you use a real programming language?"How To Use The Current Version
Making a Sound
Either drag and drop a midi file onto the window, and it should play, OR, click 'Enable Keyboard' to have a realtime QWERTY affair, OR if you have the Jazz Plugin installed, click 'Init Jazz Plugin' for realtime MIDI input.(There is also experimental pitch-detection audio input, see alternative input methods below.)
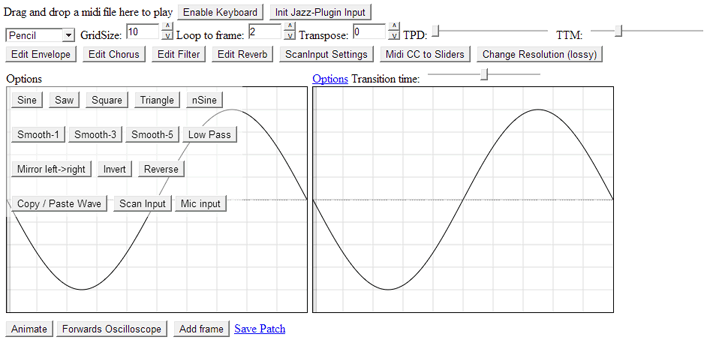
Drawing waves
The first dropdown box lets you choose a drawing tool - pencil by default.The line tool lets you draw straight lines.
The Bezier tool lets you do curves, and it operates the same way as in MSPaint: drag one line on the first mouse press, bend it once with the second mouse press, and bend it again with the third mouse press, where upon release it is rendered.
The brush and smudge tools are nice ways to modify a wave just slightly, without the harshness of the other tools. When you select them, a tiny BrushSize slider appears next to the box.
The dribble tool is a bit of fun, it smooths the lines as you draw them.
The Hand tool lets you phase shift and adjust DC offset - just to make things easier to draw, since as soon as you release the mouse button the DC will be internally levelled. (There is also a Normalize button in the frame options)
Amplitude should be pretty self-explanatory. If you want it to clip, use the ShapeRender tool with overdrive.
The Stretch tool lets you squeeze many copies of the waveform into the same frame, just drag left or right. Importantly, if you use the right mouse button, it will round to quarter-period lengths, to make it easier to line the cycles up.
The ShapeRender tool applies the current filter to the waveform. It only makes sense to do this with the waveshapers. The x-position of your mouse controls the multiplier and although it is autonormalized, the filter level must be non-zero. It is rendered on release of the mouse button.
Behind the wave you can see its Fourier transform, which you can manipulate using the Reverse Spectrum Tools. [Note: These tools depend heavily on fast fourier transforms, so you might get better results if you change your resolution to be a power of two. But no pressure, since it resamples internally elsewise. The only reason I chose a default resolution of 400 was to be able to fit three keyframes horizontally on a single 1280px-wide monitor.]
DrawSpectrum - Draw the magnitude of the Fourier components (at last!). This was the logical extension to the drawbars input, and if you zoom in (using the option at the top) it essentially becomes the same, although maybe the drawbars make handling individual bars easier. The highest components aren't noticeable unless you play a very low note. The very lowest bar is the DC offset which is handled automatically. Use the right mouse button to erase frequencies.
DrawPhase - I'm not entirely satisfied with this tool, mainly because I'm not entirely satisfied with how I've represented phase on the diagrams. At the moment it just draws a small rectangle on the main bar. Audibly, this tool has virtually no effect, but it does make a difference, most noticably for the tweening between frames. Also it affects how the wave clips, of course. It's interesting to take, say, a square wave, and listen to it as you muck about with its component phases. Drawing a horizontal line will line up all phases.
Chopper tool - the fastest rolloff in the west! - erases all frequencies above where you've clicked.
Resonance Brush - Changes the magnitudes in a much smoother way. You can add a resonant peak to the spectrum. The BrushSize dial appears again and now represents the Q-factor - use a small brush for a tight peak. Another benefit of this tool is that it multiplies, not adds, so if a component is zero it will stay zero. This means you can manipulate a square wave spectrum without gaining any even components.
Notch tool - Opposite of the Resonance brush, and also useful for smoothly rolling off areas.
FreqSlider - Sheer madness, transpose the values of each component up or down the fourier spectrum. If you zoom out far enough you can even turn the whole spectrum back-to-front.
PhaseSlider tool - this one genuinely is pointless, apart from the educational value. Unlike the PhaseShift tool, this shifts all component frequencies by the same amount. On its own the waveform should sound pretty much identical (but there are differences, like how it clips and how it interpolates with other frames). Analytically a 90° phase-shifted square becomes, err, log| tan x | ?
Changing the grid size has no effect on anything except making it easier to draw the wave you want.
Ctrl+Z will undo the last change to a waveform.
The Frames and their Transition Times
You start off with two frames, and can add more with the button at the bottom. Since many people have difficulty understanding quite what this represents, I added an 'animate' button. As an example, draw two different wave frames, and click animate. Now go back and change the transition time above the second frame (although it's above the second frame, it refers to the time between frame 1 and 2). Animate again, et voila!The two sliders at the top right stand for Transition Pitch Dependency and Transition Time Master. The first one attempts to scale the transitions with pitch with varying degrees of success. The master control is actually reciprocal: move it to the left to disable transitions and lock to the first frame.
If you have more than two frames, you can make use of looping. Notice the 'loop to frame' input. If it is anything other than the number of frames you have, the note will enter a continuous loop of timbre. You can only go as low as 2 partly due to laziness and partly because a transition time is needed for the return stroke.
Frame Options
The options dropdown above each frame is more powerful than you think. The first row of buttons gives a bunch of standard waves you might want. Noise is useful for combining with other waveforms using the partial merge option.The second row is meant to help you out after drawing with the pencil, with different radius smoothing functions.
Rephase randomises phase components, meaning the wave sounds basically the same but looks totally different. This is just a temporary measure until I come up with an autophase button: I'd like it to choose the best phases to minimise the total amplitude.
Mirror left-to-right lets you make perfectly symmetrical waves (the left is mirrored and the right half is just thrown away). Inverting and reversing are useful too. Normalize removes any DC offset in the wave (although this is only a visual thing as the waves are now leveled internally) and adjusts the maximum amplitude to the frame height.
Copy/Paste wave is extremely useful. It tells you exactly how the program is seeing the wave in numbers. Clicking 'OK' will set that frame to have those numbers. In this way you can move waves around exactly. Clicking 'partial merge', instead of replacing the frame with that wave, will attempt to merge the waves. This can be very useful for generating new waveforms but might take some toying with to get your head around. You can also combine this with the nSine function to do pseudo-additive synthesis. [Update Feb 2014: nSine has now be replaced with the Stretch tool] There is very little error checking here. For Save-as-wav, Save-as-Image, see the Importing/Exporting waveforms section below.
Fifthify is a shortcut which copy-pastes the wave onto itself in a 2:3 ratio.
ScanInput requires midi input and is explained below.
Mic Input lets you record your voice or any instrument you have to hand. The new window opens, and if you are using chrome, should show an oscilloscope of your computer's microphone. Make a noise that you like, preferably one that has a distinct waveform, and press the spacebar. This pauses the scope. Then, use your mouse to draw a red box around the waveform you want to sample. If it sounds good, hit Save Waveform to import it into the reverse oscilloscope.
Drawbars lies somewhere between a Hammond organ and a reverse spectrum. You can set the exact amplitudes of the first 32 harmonics. This corresponds to drawing the lower portion of the fourier spectrum. The result is always too perfect to be realistic of course, but you can smear the harmonics by using chorus and wobble. You can also get dischordant ratios by not using the lowest few drawbars, and then transposing down a few octaves. Update: I have now made the drawbars initially jump to the fourier transform of the original wave. If you constructed the wave using drawbars to begin with, they should match exactly. If your wave is smooth, you'll probably end up with a wave that looks different but sounds the same, because the phase data has been lost. So this means you can open the drawbars and just tweak the harmonics a little bit. Obviously, I've only put 32 drawbars so it won't be able to construct waves perfectly. If you want more drawbars: use the reverse spectrum tools.
The Sliders and Midi
If you are using Jazz, it becomes helpful to alter controls from your hardware. To do this you can right click on any slider, and type a Midi CC value. This will then link that control to a physical control. You can manage what points to what by clicking the 'Midi CC to Sliders' button. It lists the sliders by their not-quite-intuitive IDs, but I'm sure you can work it out.The sliders take precedence when there's a clash - setting CC1 to a slider will stop your control of modulation.
If you have a specific hardware setup, you can save and reload these controls as part of a patch - see below.
You can use 130 and 131 to point to note velocity and note number, obviously only useful for monophonic stuff really. This is called at the beginning of the envelope only. I wasn't sure whether using velocity to control a slider should overwrite the default control over volume... currently it doesn't [Update: 130 & 131 now trigger from the arpeggiator, on condition that it's set to retrigger envelope]. Finally, type in 132 to get a slider to respond to Channel Aftertouch.
You can now change the scaling of sliders too. Make sure the slider you want to modify is highlighted in the list and min/max controls appear. The incoming 0 to 127 value will always be mapped to the length of the slider; the min/max represent what the slider actually does, so mouse control is affected too. (Yes, you need to link to a midi number to change the scaling, but the scaling will continue if you unlink that midi control. To help keep track of this mess, the slider will turn pink if its min/max has been modified. (This won't necessarily reset when you load a new patch, only if a midi command is linked to it.))
You can swap the min/max around to achieve a negative relationship without problems. What you may find dangerous is extending outside of the normal range, this was mostly meant for minimising the range and some things will break if you send them numbers they don't like. For instance, a value of exactly zero for a transition time will cause everything to crash, but it seems pointless to waste time error checking for normally forbidden values.
The smoothing is a simple low-pass, great for masking the 127 quantization on filters and so on. It's a global value, I saw no point in having individual smoothing speeds. One unexpected benefit of smoothing is if you have a sustain pedal, set CC64 to a filter, and the smoothing makes it a half-viable expression pedal!
Checkboxes are controllable via the same mechanism as the sliders (right click to set up). By default a value above 64 corresponds to 'on' and below that is 'off'. You can swap the min/max values to reverse this, and if you set min and max to equal each other, the box will toggle on any value that comes in. This is useful if you have a button on your keyboard that always sends the same command (e.g. 'mono mode').
Scan Input
This was an experiment to try and draw waves from midi hardware. To use it, first open the Scan Input box by clicking 'ScanInput Settings' and link the input control slider to the midi CC number of a hardware slider. Then, under the options for the frame you want to draw to, hit ScanInput.The red line is your cursor. I find that faster speeds are more useful. Slight filtering is useful too, especially if your hardware has a slow readout rate. Press the spacebar to stop, and again to start over. The great thing about this of course is you can do it while you're playing.
Edit Envelope
Only for the sake of completeness - most envelopes can be created by keyframe amplitude. Uses the slightly non-standard arrangement of AttackAmplitude, AttackTime, DecayTime, ReleaseTime. The diagram helps.All of these control boxes are toggled by the way; click the button to hide them again.
Edit Chorus
As partly explained in the analysis section, there are some sounds the scope simply cannot make. To get that thick sound of multiple oscillators, I had to add multiple oscillators. Two is enough for most purposes, with just a smidgen of detune.I finally got around to adding controls for phase scattering. The wobble will randomly adjust the detune with each buffer-refill. This is extremely effective at creating the sound of a lot of oscillators, i.e. string synth pads and so on.
The stereo option pans the oscillators as you detune them. The only reason to disable this is if you want to have crazy amounts of detune.
The last option is keyframe staggering. This is very powerful, and different to phase scattering! Phase scattering affects the instantaneous differences in frequencies between oscillators. Keyframe staggering affects the position in the waveform animation where each oscillator begins. The first oscillator will start on the first frame, the second on the second, and so on. If you have more oscillators than keyframes, it will wrap. If you have more frames than oscillators, they will all progress through the animation retaining the same one-frame difference. If it's not set to loop, they will all settle on the last frame.
But the real reason to use keyframe staggering is if you set the transition speed to zero (TTM full left). Set the number of oscillators to the number of keyframes and you now have completely independent waveforms for each oscillator. The frame detune then becomes much more useful than the default detuning, although that will still control the stereo width.
Edit Filter (& waveshapers)
The first four are your standard high pass, low pass, bandpass and notch. Using VCF-type filters isn't really necessary if you're using the scope correctly, and in fact when I tried out filter-pitch-tracking I didn't find it all that useful. However, linking the cutoff frequency to a midi slider can act nicely like a wah pedal.When combined with the forwards oscilloscope and both sliders linked to hardware controls, it serves as a very educational tool on the behaviour of filters.
The Overdrive filter is hard-clipping of the wave, exactly as if you turned up the amplitude normally, except less prone to breaking things. Level is clipping amount, i.e. the output volume, so if you can't hear anything you probably have it on zero. For experimenting with this and the other overdrive effects you might want to set the envelope attack time to be large, and maybe the attack amplitude to zero, at least to begin with.
The filter labelled Waveshaper is a softer form of distortion, one of many possible, but this one happened to be a type I particularly liked. If you dislike the cacophony of the polyphony remember you can always turn the arpeggiator on. [Update August2014: Or use the simple polyphony checkbox. It naively routes each envelope through the filter separately, but remember to turn it off for the first four filters.]
PseudoFM is probably my favourite effect, it's simply taking the sine of the output. This means the waves you draw are controlling the pitch of the output, not the voltage. Like FM synthesis, it can lead to some crazy-cool sounds, and like FM synthesis it can be difficult to control.
The two effects labelled "meta" are completely different in their behaviour but in principle are logical extensions of the prior two. In these modes I wanted to be able to draw the response of the effect, but because I was too lazy to add yet another canvas, it uses the first frame for its input. It turns green to alert you to this. So before you begin, you should set the transition time between frames one and two to zero. The MetaFM effect will give the same output as the PseudoFM if the control frame is a sine wave. The MetaShaper controls the direct relationship between input and output samples, a sawtooth control frame will give approximately the same as the Waveshaper effect. For this it's advisable to have the wave pass through the exact centre of the frame, and to be symmetrical left-to-right, as you usually want the response of positive samples to mirror that of negative samples. It can take quite a bit of work to get a good output (I recommend smoothing everything) but the results can be brain-meltingly sweet. It's very helpful to look at the forwards oscilloscope while you're working on it to get an idea of what's going on.
The Bitcrusher - just in case you're starting to miss the aliasing - reduces the apparent bit-depth of the output, without any dithering, which creates a very digital sounding overdrive. Wrap is doing a modulo on the output, which happily preserves polarity and thus the fundamental freq.
Ringmod - Ring modulation is essentially amplitude modulation, litterally it is just multiplying two signals. Simply because we could. Again it uses the first frame as a control. (Ringmod can also be achieved through extending the TTM slider and looping between two frames where one is the inverted signal of the other. This gives a triangular ringmod.)
Note that many of these waveshapers' main control is simply controlling pre-gain; as such it may be easier/faster to use your keyboard's volume control to work them.
Edit Reverb
Obligatory reverb of mediocre quality - it does help to make the sound a little more organic and definitely serves a purpose when you want the synth to be a standalone program. The main sliders you'll want to play with are damping (low pass filtering on the delay), delay and delay volume.Update Feb 2014: Reverb now has improved controls, letting you set the number of each type of delay, and their spacing.
Frame Detune
This is something to play with when you know how the rest of the scope works, I think. It's very easy to create bizare and wonderfully amusical noises through this, but if used subtley it can actually work really well. Keyframes change colour when they've been detuned. Note that unlike the portamento, which approaches the frequency exponentially, the keyframe detune is tweened linearly, like the rest of the keyframe interpolation. I'm not sure what bearing that might have on sound creation.Arpeggiator
I know I might have said I didn't want to waste time adding what can easily be done with other Midi tools, but more and more I've been using the scope as a standalone synth, and arpeggiators are certainly useful when you want to pretend that you have Rick Wakeman's fingers. Top speed is limited by the buffer size, as like the rest of the scope, it's set to only recalculate frequency at the buffer refill (I've tried it recalculating on every sample and you can hardly hear the difference, except in comically large portamento swoops). It will also wait for the envelope release time if you set it to retrigger on each pulse, so the ADSR controls affect the speed too.Don't forget that it supports portamento of course. Another thing to do is set the speed slow, hold down one note and play a staccato melody around it. If you're retriggering, you'll want to set a very short envelope release time. I can't remember what that effect is called. Also, if you turn retriggering off and play a melody where the notes 'bleed' into each other it will use a single envelope (and single keyframe run) for the whole riff, causing a glissando-type effect. The possibilities!
The arpeggiator tends to break if you use multiple channels, this won't be hard to fix but for now I'll stick it on my TTD. I also need to make it pass in each new velocity, at the moment it sticks to the velocity of the first note.
Sequencer
It's quite simple but more than enough for most purposes. Hit record to begin recording all noteOn note numbers. Stop and it will enter playback mode; press a key to play back the sequence and it will transpose to that starting note. Speed of playback is controlled by the arpeggiator control. There are two hacky things you can do instead of hitting End which I deliberately left in: enabling/disabling the arpeggiator will keep the sequencer going but break off control of it. If it's set to retrigger envelope, you can play a melody on top of your sequence, if not, all the notes you play will follow the same pitch pattern like some crazy polyphonic sequencer.Now that I think about it, a better interface would have been to have to hold down the initial note (or pedal it) for the sequence to play; holding multiple notes would then do polyphonic sequencing. I'll add that to the list.
Change Resolution
By most accounts, the default width of your canvas waveforms (400px) is very low quality. Wavetable synthesis usually starts at at least 1024 samples. The synth does try to interpolate so it's not so bad, but maybe making more detailed waveforms will improve the sound. Having larger resolutions does make it quite hard to fit all on the screen though. It's lossy because each time you change res, the waveforms are resampled to that size.Saving and Loading Patches
Another feature that was very, very quickly added, I think actually during a jam. It dumps all the necessary variables as JSON into a plaintext file. To load a patch, just drag and drop that text file onto the window. If you drag and drop a whole bunch of text files, you can scroll through them by sending midi program change commands.I would advise inspecting any patches other people share with you before loading them, the loading sequence is just an eval() with no error checking. Beware!
To save a patch just hit the link at the bottom of the page. You may want to save a 'blank' patch with just your hardware midi CC slider setup.
Importing / Exporting individual waveforms
There are multiple ways to import waveforms - mostly because I kept finding them in different formats. If you have a mono wav file, you can drop it onto the frame you want and it should load and resample it all automatically. The same should happen with images of the waveform - although I can't vouch for the quality. Make sure the image is at maximum contrast. You can also paste a wave in by using the copy/paste wave button under the frame options. AdventureKid has a nice selection of waveforms to play with. There are lots of places out on the web with just pictures of waveforms though.On the same copy/paste wave screen you can also save your waveform as an image or a wav file. This is useful if you don't trust the patch system. Saving as a wav file is probably the best method in terms of filesize. But an advantage of having them as images is that you can scroll through a folder and see their thumbnails.
Other Controls
The transpose input simply offsets the pitch by that number of semitones.The forwards oscilloscope is scoping the exact output of the program. It's very satisfying to watch whilst playing and changing options.
Phase-match Frames is an attempt to reduce unexpected timbres occurring during frame tweens. It copies and pastes the phase data of the first frame to all the other frames.
To reset everything, just hit refresh. If the scope crashes or glitches, it will usually still let you save a patch, so you can refresh and load it again.
Midi commands understood by the synthesizer
These are ones you may or may not want to avoid when configuring your hardware sliders.• NoteOn (velocity is interpreted just as volume)
• NoteOff
• SetTempo
• ProgramChange - cycles through patches you've loaded
• Pitch Bend
• RPN for Pitch Bend Sensitivity [CC 6, 38, 100, 101]
• Modulation [CC 1] i.e. pitch modulation
• Portamento [CC 5] Great swooping polyphonic portamento! Possibly not implemented the way the standard asks for.
• Channel Volume [CC 7, 11]
• Stereo Pan [CC 10]
• Sustain Pedal [CC 64]
• Channel Aftertouch - represented as CC 132, routes to modulation by default.
Pitch bend and modulation really do add to the synth. I left them out for a long time - I'm not sure why, I thought it would be incredibly complicated to add but it turned out to be very straightforward. S'all about phase, innit.
Rendering Algorithm (added September 2014)
If in doubt, go with the Standard FIR option. That's the time-domain rendering with fairly good antialiasing that was used before this control was added, and is probably the best bet for most patches. The Additive option is the self-oscillating filter bank that I wrote about here.The Additive rendering works from the frequency-domain, and outputs waves that are completely alias-free. You can really hear this on the highest notes: Additive sounds much nicer. It does not however pay any attention to phase data, which is totally inaudible unless you're using the waveshapers, in which case the results will vary wildly.
(A disadvantage to Additive is it only calculates the coefficients at the beginning of the envelope. I didn't think this would be a problem except for the very longest notes, but then there's the arpeggiator, which if you uncheck 'Retrigger Envelope' will use one long envelope for the sequence. In this case, the rounding errors quickly stack up and the whole thing goes to pieces. I may add make a fix specific to using the arpeggiator and Additive together.)
Another factor is processing power: additive struggles with the low notes but works better the higher you get. If your patch is intended to be soprano, choose Additive and you'll get the dual benefit of perfectly rendered sound with low CPU usage.
The fidelity of the sound, for both methods, it based on the resolution. But thanks to linear interpolation, the time-domain method can get away with a much lower resolution. With Additive, at the default 400px, there are only 256 harmonics available to render - that's all the information there is - so the spectrum of the lowest notes becomes truncated. If you want to make a crunchy bass patch, go with Standard FIR.
The Naïve option is what the earliest versions of the scope used, where no effort is made to anti-alias the sound. There are certain patches where the aliasing is inaudible anyway. Another reason to use this is if you're running the synth on a phone or an old computer where the processing power can't cope with the more complicated algorithms.
I know I've made this overcomplicated, so here's one last way of thinking about it. Looking at a waveform in the synthesizer, the Nyquist frequency for a given note could be imagined as a marker on its spectrum. Something like this:
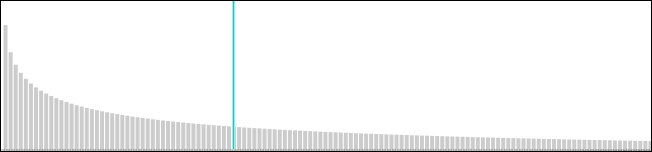
Anything to the right of this line will be turned into noise. The Additive method completely removes it, so it sends this:
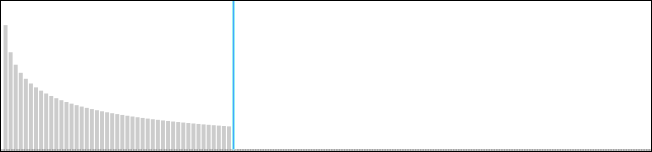
whilst the Standard FIR method filters it to be something like this:

So there's some aliasing left, and some of the higher frequencies we wanted to keep have been reduced. If your waveform doesn't have anything past this line, there's no need to worry about antialiasing at all, so use Naïve. But of course, the position of the blue line depends on the pitch of the note you're playing. The higher the note, the further to the left it moves.
Going beyond what I can be bothered to make controls for
I have more ideas than I can possibly implement, let alone make cute little controls for. Here are a few ways of extending the 'scope, using the browser console to modify things on the fly.Update: Actually, since you can now adjust the slider scaling ranges using the Midi Sliders box, most things no longer need to be done through the console. You can quite happily increase the reverb delays for echo effects and so on using that mechanism.
Extreme Chorus Detune
Beyond the slider - the global variable chorus[1] controls detuning, with the oscillator pitches evenly spaced. chorus[0]=3;chorus[1]=0.4 gives a just major triad. Anything beyond that is now easier to achieve using keyframe staggering and frame detune.More on Channel 1
For the things you can't extend with the midi sliders, channel 1 is linked to a variable called window.TEMPIN. So for instance you can set window.TEMPIN.modulation(0.2) to have an enormous modulation depth of 20%.Railsback Curve & Autotuning Filter Resonance
If you grew up with the sound of a piano you might find equal temperament to be a little dull - I know I do. The pitch control is designed to be easy to modify and is controlled by one function, midiToFrequency(). I like to approximate a Railsback curve by changing the base 2 to be base 1.99. To implement this just paste this into the console and press enter:
function midiToFrequency(note, bend) {
	return 440 * Math.pow(1.99, (note +TRANSPOSE+ Sequence + bend[1]*(bend[0]-8192)/8192 -69)/12);
}
This is partly why I loved developing the prototype in-browser, being able to change pitch algorithm while it's playing. The possibilities are endless... another one I did was autotune the resonance/cutoff frequency of the filter to equal-temperament. This is a subtle effect, since the pixelation of the slider already locks it to some arbitrary frequencies. Pasting this into the console will make them 'round' to the nearest note:
document.getElementById('flt1').linkobj.onchange=function(){
  ctrlFilter[1]=440*Math.pow(2,Math.round(12*Math.log((this.value*this.value/20)/440)/Math.LN2)/12);
  filter.update(ctrlFilter[1],ctrlFilter[3]);
}
If you want to save that effect, just paste the code onto the end of the patch file.Save audio to file
The easiest way to record your output is with audacity and the correct options. But if you want to record the exact, sample output of the synth there is a way of doing that too. It only works with a midi file, not live input. Open the console and type: OUTPUT_TO_FILE=1Now drag and drop your midi file onto the page, and wait. This is a great way of rendering stupid amounts of oscillators on a slow computer, as it can take longer than the actual song to render. Be warned though, there's no real error checking again, and instead of clipping when the amplitude is too great, it wraps the waveshape, causing all kinds of noise. So watch your amplitude.
When it's done, you need to open a new tab and visit the url to your file - that's including the filesystem: scheme prefix. Then save to disk.
Analysis of the Reverse Oscilloscope Technique
Limitations of harmonics
When I started out, I had hoped to build a synthesizer that could create any sound. This blatantly isn't possible since all the waveforms are single-cycle: all harmonics are exact multiples of the fundamental. This means we will never be able to synthesize, for instance, a piano. Its characteristic sound is based on the fact that the strings' harmonics deviate from the predicted vibrations - hence all that Railsback guff. The only real way to get around this is through creative filtering, turning us back into a subtractive synthesizer.But the exact-multiple-overtone-limit isn't actually exact. It is possible to have some frequencies sound which aren't present in the waveform. I am not really sure of what the limits are. But branching out further, it's possible to use the reverse oscilloscope to generate far more by using multiple-cycle waveforms, and transposing down accordingly. Even without increasing the resolution this works remarkably well, and creates many bizare or sometimes dissonant tones (i.e. with the 'wrong' implied fundamental). So some subharmonics can be made; I would very much like to properly analyse this. What spectrums can and can't you make with a reverse oscilloscope?
Phase data
The simplest way to grasp the phase problem is by using the mic input window (or that other browser oscilloscope that I made) to view your own voice. Sing a note, then stop, and try and sing exactly the same note again. Although it may sound very very similar, the waveform often looks completely different.You can see even clearer if you use the built-in Forwards Oscilloscope on plain sinewaves from the Reverse Oscilloscope. Play two notes, an octave apart. Now stop and play them again. Chances are their phases won't match up and the waveform looks different, even though it sounds the same to our ears.
This fundamental lack of a one-to-one map between sounds and their time-domain shapes was quite a blow. It's probably something I wouldn't have grasped if I hadn't made the reverse oscilloscope though. The solution, of course, is to work in the frequency domain; this is the subject of the Reverse Spectrogram below.
The time-domain representation isn't that bad, though. One thing worth noting is that a square wave and a triangle wave are made up of the same frequency series, just at different amplitudes. In this example, looking at the time-domain representation is arguably an easier way of guessing what they will sound like.
Realistic Results
In trying to reproduce a specific sound, say, from an actual instrument, the results can be unexpected. Surprisingly, some instruments can be synthesized with remarkable accuracy. As you would expect, these are instruments with harmonic overtones. From waveforms alone one can create very realistic sounding clavinets, harpsichords and organs. Some brass instruments can be approximated very well. With chorus there is no difficulty creating an accordion (not because it's particularly good at emulating free reeds, but because the character of an accordion comes from having dual reeds), and with phase scattering/wobble, string ensembles and even choir oohs and aahs become a doddle. Using vibrato and reverb you can create a truly impressive cello patch - which makes sense if you explore the physics of its sound generation. As mentioned previously, an awful lot of the timbre is described by the very beginning of a note, and using short keyframes this can be achieved quite successfully. Like any synth, your result is mostly down to how much effort you put into the patch.Unrealistic Results
When it comes to chiptune sounds, the Reverse Oscilloscope succeeds magnificently.Naturally I didn't want to make a synth that reinvented old sounds, I wanted to make new sounds. Whether I have achieved that is a very difficult question to answer. For a start, unlike many synths which use knobs and sliders exclusively, the drawing surface here gives a stupendously large number of possibilities, and most of them are yet to be explored.
One of the more bizare sounds is produced quite frequently when redrawing a waveform while a note is playing. This, much like changing the duty cycle of a pulse wave, seems to scroll through many different timbres.
Let us not forget combining the Reverse Oscilloscope with conventional synthesis techniques. I suppose the real question is, given a modular synthesizer setup, who wouldn't want the option of a Reverse Oscilloscope stage?
If you want to know more about synthesis I strongly recommend Synth Secrets by Gordon Reid. The entire series is excellent.
On the Agenda...
At some point in the near future, I shall upload a bunch of patches I have made for people to try out. One problem is that there are so many different versions and most of their patches are incompatible.Below is an assortment of some of the features I plan to add to the 'scope.
Actual Pitch Dependency
A glaringly obvious omission from the synth's repertoire. As well having keyframes in time, we need keyframes in pitch. And possibly keyframes in velocity. This functionality (pitch and velocity dependency) is piss-easy to do on a modular synth. But it would require a major redesign to implement. One of my early sketches depicts what I was aiming for if time, money and computing power were no object: a single scope screen, where sliders / tabs all the way around allow you to traverse through the waveform's characteristics at any pitch, velocity, envelope stage, etc. The program would then tween between all of them as necessary. One can dream...Release Keyframes
The keyframes currently cover attack and sustain nicely, especially with loop. But there would be a benefit to having a release frame - or frames - and then we could forgo the envelope entirely.More filters
Having only just discovered musicdsp.org, I suppose I now have no excuse not to extend the available filters to include a Moog Ladder filter and so on.Bandlimit the Waveshapers
It's their biggest downfall. It'd also be good to have a few softer forms of distortion.Alternative Input methods
You may notice the option for Audio Input. This is very experimental - it performs a zero-crossing based pitch detection on the microphone input (or your computer's line-in). It needs improvement but it's good enough for controlling the synth from a stylophone (although it has very dirty waveforms and a rectangular envelope so a lot of input filtering is needed). You can also whistle, obviously, which needs no filtering, but the main instrument I wanted this for is a theremin. The detection is nowhere near what you'd get from a real pitch-to-midi converter but it would be interesting to see how they compare - I shall invest in one soon.(Another instrument this works with is a Korg Monotron. A real analogue synth with ribbon controller for £30! I got one the moment I discovered its existence. The built in filter means ribbon-control of the Reverse Oscilloscope is very acurate.)
The algorithm could be improved greatly, but pitch-detection isn't the only thing we could do with audio input. It could be combined with midi input to do a bunch of things you'd normally need lots of hardware for, such as controlling the envelope while the midi notes control the pitch. It would be possible to create a rudimentary breath controller like this, maybe a microphone in a tube which you blow through - I wonder how well you could insulate the outside sound? - or we could try a piezoelectric pickup to be used as a pressure sensor. I've no idea if it's the correct order of magnitude and you'd also have to do some integration, if we were just measuring the DC offset caused by it, as the crystal will leak back to zero voltage over some time period. I definitely need to research this more.
But all of those ideas are just me trying to compensate for lack of specialist midi gear, the real capabilities of audio in are of course trying to construct a Reverse Oscilloscope/Reverse Spectrogram Vocoder. So many avenues to explore...
Nyquist Dilemma
Ah, to make the scope generate bandlimited waves. If you have harmonic-rich waveforms and play them at high frequencies, those components above the Nyquist frequency have a tendency to fold around into the audible range, causing characteristic (you might say disgusting) artefacts. These are most noticeable when the wave is changing pitch. Although the cause is obvious the solution is a bit of a conundrum. In order to make a bandwidth-limited waveform it has to be filtered (cut everything above Nyquist) before being sampled at 48khz or whatever. Unlike synthesizers that use fixed waveforms, we can't pre-processes this.Update: Although we still have a Nyquist problem, we no longer have a Nyquist dilemma. I have managed to improve the sound by making a number of sacrifices.
What I've done is cache the keyframe-transition wave on each buffer refill, which is a barely audible change and a perfectly reasonable thing to do given that the frequency is only updated on the buffer refill. This makes the sample interpolation one dimensional again, so we can filter the cached waveform - proportional to the pitch frequency. The main breakthrough here is to filter it symmetrically (I don't know if that's the proper term) as in, lowpass forwards in time, then lowpass backwards in time, so that the total phase offset is zero. I used my smoothing algorithm for this, god knows what the rolloff is, but it seems to be an excellent compromise: aliasing is reduced by about 80% with no audible change in sound for low pitch notes. I will continue to tweak this.
Note that before coming to this solution, I actually did make a version which FFT'd, chopped, and reverse FFT'd each generator. Although it worked, and wasn't as computationally intensive as I'd expected, it actually introduced other, different aliasing which offset the benefits. After a while with no success I gave up with that direction.
Update (April 2014): What a palava! I subsequently decided that I hated keyframe caching, as it ruined some of my older patches which relied on very fast transition times. I've now changed it back to 2D interpolation. The algorithm now looks at all the waveform samples between the two sampling points and averages them, which gives a similar result in terms of reducing nyquist noise. Is it perfect? - no, but it works. The CPU usage has gone up by an order of magnitude, especially on the high notes, but the scope still runs on my 5-year-old laptop, so things can't be that bad.
Update (September 2014): the tribulations continue here.
Improve the sampler
Really we shouldn't need to manually find the edges of the waveform when using microphone input to draw a wave. Some pitch-detection and fourier should be able to tackle this easily.Skin
It has been suggested that I make a nice-looking skin for the synth. Certainly green waves should bring back some phosphor-nostalgia. I might knock out something along the lines of the doodle at the top of this page.VST?
From the outset it was clear that this would never be a 'real' synth until it left the realms of Javascript. Was it a waste of time then? Although the quality maybe isn't production-level, it's been an excellent vector for exploring the concepts of this method of synthesis. Even if the results are that it isn't a viable form of synthesis, it's a result nevertheless. I also learned an awful lot in the process.Having said that, I would love, love to have a team of minions remake this as a VST and with fewer glitches, and to implement the masses of features which still only exist on paper.
Hardware Version
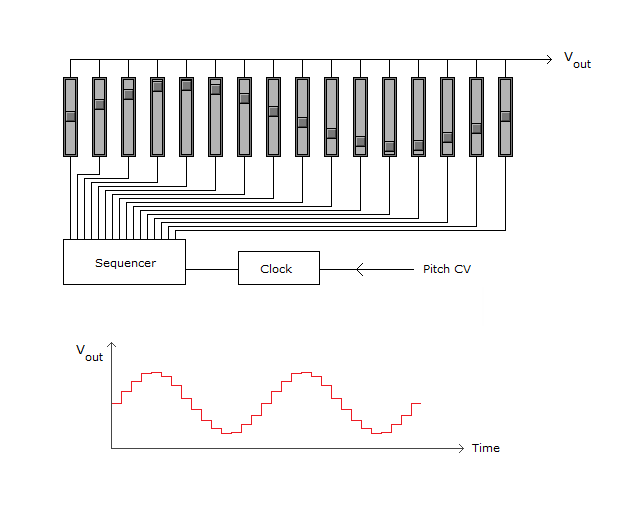
Is it possible to build a physical instrument out of this? Yes, of course, if we just want to cram computing power into a box. But what about an analogue synth? In fact, it's been possible to do this for a very long time, and I'd be surprised if no one has thought of it.Sequencers for analogue synths have existed ever since Donna Summer introduced us to them. A sequencer is a series of potentiometers with a clock to cycle through their values one at a time. You connect the output voltages into your synth's CV input. But if you didn't connect it to an oscillator, just connect the output voltage to a speaker, and turned the sequencing frequency up enormously, you're left with a very low-resolution reverse oscilloscope. Genius!
Well, whenever I next find a joblot of slide potentiometers I might build it. Until then we'll have to make do with lame, digital, polyphonic nonsense.
In terms of a midi controller for this, I have been working on something for some time which warrants a separate projects page - a bespoke keytar - coming soon.
Reverse Spectrogram
The logical successor to the reverse oscilloscope, the reverse spectrogram, has been a tantalising goal from very early on in the project. It would solve many of the problems brought up in the analysis section. It is much harder to create though.I have created several simpler reverse spectrograms, but all have major flaws. The first one to successfully circumvent the phase flaws used direct brute-force to add up sine waves. Their phase is randomized to begin with and then progressively calculated. Although this gives a good output, for anything but the simplest sounds it is catastrophically computationally intensive. The next excursions into Spectrogram land attempted to reverse FFT. Again, these sort-of worked... I did manage to get some very funky sounds going, but it doesn't really feel like success since they weren't the sounds I was aiming for.
The third direction I went in was progressive rendering of sinewaves. To be fair I should probably type up a separate page all about this. Essentially, this spectrogram has an enormous buffer containing the sound output in full, and upon each brushstroke renders the appropriate sounds. Although it works perfectly, the sound is almost too perfect, too clean, and it usually sounds as if it is just a series of sinewaves added up. One of the problems is inputting a clean progression of harmonics. There is a lot, lot more work to do and ideas to explore in this area.
A polished reverse spectrogram would be brilliant, but it also has fundamental flaws. The primary is that you have too much control, and it's almost impossible to achieve a harmonious sound. Another problem with using a spectrogram representation is that your resolution is much worse at the lower frequencies, and scales logarithmically. I clearly need to come up with a way of locking the frequencies to integer multiples of the fundamental, and then allowing precise but limited deviations from there.
Edit: I've put some of them up on this page.
Update: Following futher research into hardware versions and reverse spectrograms I have made a number of discoveries, namely that I have been beaten to it, many decades ago. This history of optical tonewheels is synthesizer pornography. The most relevant part is the history of the variophone. As we know, a motion picture soundtrack is optically recorded on the film to ensure syncronisation. In the process of making cartoons, a number of people started drawing waveforms in the soundtrack region to laboriously produce artificial sounds. The variophone mechanised the process as it used - yes - optical tonewheels: the waveform is plotted in polar coordinates on a disk and scanned past the film. It's a reverse oscilloscope (kind of)! And this was in the 1930s! Do check out the link for more information and also some of the surviving footage. My favourite part, I think, is that polyphony is achieved by simply drawing waves adjacent to each other - they're summed in the process of reading the film, of course.
Another point of interest is the ANS Synthesizer. Whilst I'd known about this at the back of my mind, I hadn't really registered what it did until I heard an example of it. It sounds shockingly similar to the output of some of my reverse spectrogram experiments.
I suppose the next thing I need to do is record some demo tracks of me playing the 'scope. I shall get around to it... eventually.
If you want to contact me you can, although I can't promise I'll take any notice.