
| fogh1 | Posted: 9 Aug 2022, 04:24 AM |
|---|---|
 Member Posts: 7 Joined: 9-August 22 |
In the build instructions for the GPS clock, there is a section for changing the timezone on the clock (https://mitxela.com/projects/precision_clock_mk_iii/assembly_instructions#change-timezone). Since I have recently moved to a new timezone, I figured I would try this. I see that the instructions show how to use a USBASP programmer, which is fine, but I had a spare Arduino nano clone (from Keyestudio: https://wiki.keyestudio.com/Ks0173_keyestudio_Nano_ch340) lying around so I figured I could use that instead, and save a few dollars and time waiting for the programmer to arrive. I got it to work eventually. First you will have to wire up the Arduino to the ATTiny2313 like so: 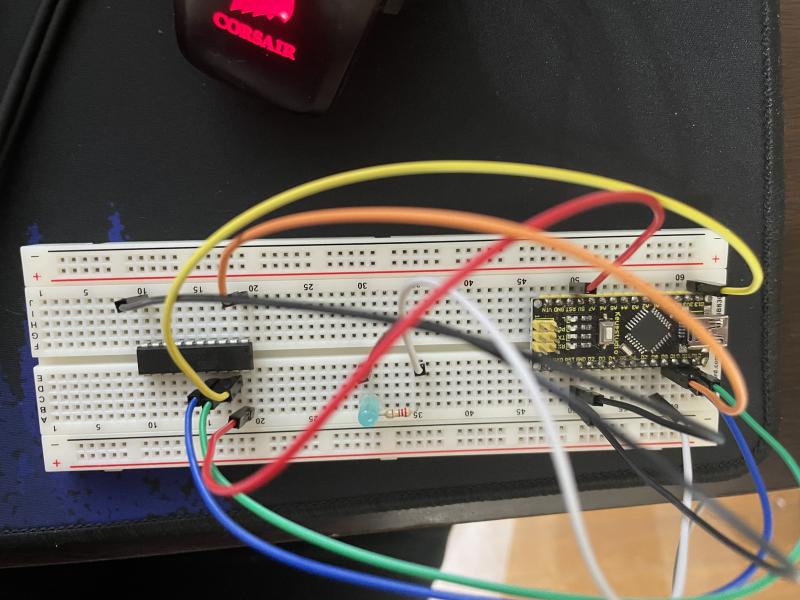 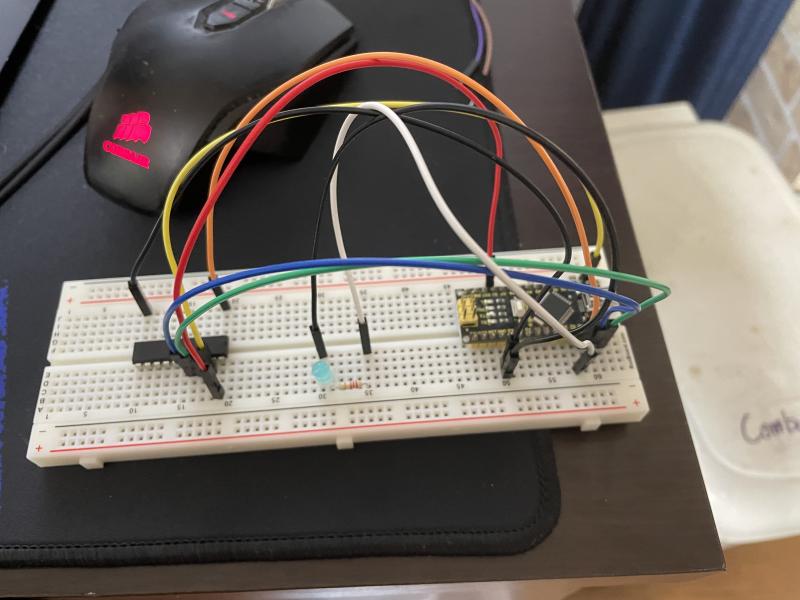 I have two pictures here so you can see what pins lead to where. Note that the ATTiny is "upside down" in the pictures (pin 1 is upper right). Basically I use digital pins 10-13 on the Arduino as reset, MOSI, MISO, and SCK respectively. Note that you could also use the ICSP pins on the Arduino as well, which is actually the preferred method, but most Arduinos will have the ICSP pins and pins 11-13 tied together anyways. You can verify the ATTiny2313 pinout here: 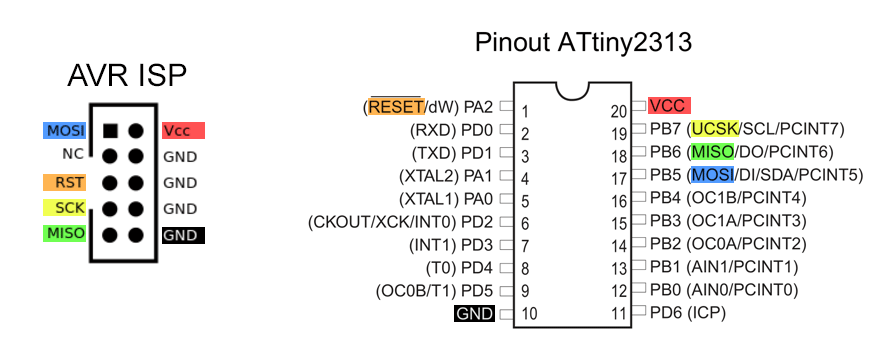  This allows me to montioner the programmer's status during avrdude's programming. I also just wire ground and 5V from the arduino pin to the ATTiny's ground and VCC. Finally, I connect my arduino to my PC using a usb cable. I would probably recommend leaving the ATTiny disconnected from the arduino until you are ready to run the avrdude command to flash the new time zone firmware, and power off the arduino before connecting/disconnecting the ATTiny. The rest will be on your computer. First you should use the arduino IDE program, so install that (https://www.arduino.cc/en/software). Open it and go to File->Examples->11.ArduinoISP->ArduinoISP. This will open a new window with a sketch to turn your Arduino into a programmer. If you are using pins 11-13 on your arduino to program, and not the ICSP pins, then find the line // #define USE_OLD_STYLE_WIRING and uncomment it. You may not need to but better to do it anyways. I recommend reading the comments in the sketch anyways as it helps teach you how to use and wire the programmer correctly, but otherwise I didn't touch the code here. Now just upload it to your arduino like you would any other sketch (make sure you are using the right port/programmer/board/etc). Once the upload finishes we can move to the next step. The next step: flash the firmware. First download/git clone the firmware from https://github.com/mitxela/PrecisionClockMkII, unpack if compressed, and navigate to it in your command line of choice. I used linux terminal to do this, but windows cmd/powershell or MacOS terminal works too. Make sure you have avrdude installed. The avrdude program binary actually comes with your arduino installation (or you can just download the command standalone, on ubuntu, I just did sudo apt install avrdude). You can find the location of the binary by enabling "Show verbose output during upload" in the arduino IDE's preferences (File->Preferences), and trying to upload any sketch (you can disconnect your arduino from your PC for this step so you don't overwrite the ArdiunoISP sketch we already uploaded, the upload doesn't actually have to upload for this to work). If you scroll to the top of the terminal output in the IDE, you should see a line that right after the "Global varibles..." line that is the avrdude command. On ubuntu, mine looks like this: /home/USER/.arduino15/packages/arduino/tools/avrdude/6.3.0-arduino17/bin/avrdude -C/home/USER/.arduino15/packages/arduino/tools/avrdude/6.3.0-arduino17/etc/avrdude.conf -v -patmega328p -carduino -P/dev/ttyUSB0 -b115200 -D -Uflash:w:/tmp/arduino_build_189207/Blink.ino.hex:i This command is just trying to flash the compiled Blink.ino file as Blink.ino.hex onto a ATMega328p using the "arduino" programmer. If you run this command in your terminal, you could upload hex files to your Arduino UNO (as long as your in the directory with the hex file). We need to change a few things here to upload our new clock firmware to the ATTiny2313. First the -p option should be t2313 for ATTiny2313, not atmega328p. Next, the ArduinoISP runs at a baud rate of 19200, not 115200, so change the -b option to 19200. I chose to remove the -D option, so the flash would be auto-erased first before flashing new firmware. The -v option just give verbose output which can help debug things if things aren't working. -P option lists your port, which should be the same port you used to upload the ArduinoISP sketch to your arduino board. For reasons that are explained later, we change the -c option from arduino to stk500v1. Finally the -U option points to your .hex file. In the terminal, navigate to gps clock firmware PrecisionClockMkII folder that you downloaded from github, and cd into the build folder (cd again into the with_crystal folder if you use a crystal oscillator on your clock). Here you find pre-compiled hex files for most time zones (if you have a special time zone you need to build that yourself, see the README file in the github). Now just modify your avrdude command to look like this: /path/to/avrdude -C /path/to/avrdude.conf -p attiny2313a -c stk500v1 -P YOUR_PORT_HERE -b 19200 -U flash:w:TIMEZONE.hex:i replace TIMEZONE with a timezone listed in the directory, eg. us_eastern. If you are using avrdude standalone, the command might look different, but options should be the same (other than -C the avrdude config file location), this is just using the avrdude binary that comes with arduino IDE. Also note that the location of the binary depends on operating system and other factors. Ok! Now all we need to do it hook everything up, connect the ATTiny to the arduino, connect arduino (which has the ArduinoISP sketch flashed) to PC, and flash! Run the above avrdude command in your terminal with the current working directory which has the hex file you want to flash, and avrdude should work! Here is my output: 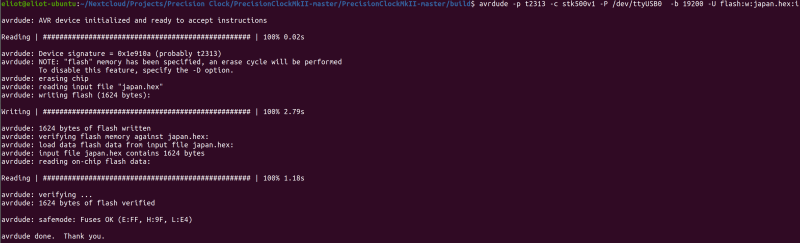 Note that I used standalone avrdude install. I wanted to post this because I had problems where I found info online showing that I should flash to the ATTiny using -c arduino, but this causes a weird problem where the Arudino resets during programming. Many forums instruct people to put a capacitor between the reset and ground pins of the programming arduino to override this, but if you just use the stk500v1 programmer, this is not a problem. Here are some links related to this issue: https://forum.arduino.cc/t/solved-arduinoisp-avrdude-on-linux/330626 https://forum.arduino.cc/t/avrdude-stk500_disable-protocol-error-expect-0x14-resp-0x10/590824 Good luck! Helpful links: How to use AVRDUDE command: https://adduino.com/upload-hex-file-on-arduino-using-avrdude-programming-avr-boards/ Post on programming ATTiny2313 using arduino UNO: https://www.ernstc.dk/arduino/2313.htm Arduino as ISP official guide: https://docs.arduino.cc/built-in-examples/arduino-isp/ArduinoISP AVRDUDE user manual: https://www.nongnu.org/avrdude/user-manual/avrdude_3.html Burning hex file in AVR: https://create.arduino.cc/projecthub/Vishalsoniindia/arduino-as-isp-burn-hex-file-in-avr-fuse-in-avr-2b37d1 ATTiny core for arduino (if you want to flash to ATTiny from inside arduino IDE): https://github.com/SpenceKonde/ATTinyCore ------------- |
| [top] | |
| fogh1 | Posted: 9 Aug 2022, 04:29 AM |
|
Member Posts: 7 Joined: 9-August 22 |
Now I just need to find a way to make new laser cut parts so that the clock displays the correct time zone instead of my old one :) ------------- |
| [top] | |
| mit | Posted: 10 Aug 2022, 09:21 AM |
 yeah whatever Admin Posts: 686 Joined: 4-May 16 |
Thanks for sharing this! For the laser-cut part, I can give a quick explanation of how I make them. I start with 3mm frosted clear acrylic, then cut out rectangles of the correct size (34.1mm by 24mm). I then spray-paint them with matt black paint. When it comes to etching the timezone onto it, it usually takes a few attempts to get the right power level and focus, it sometimes depends on how thick the paint is, and using too high a power level will melt the acrylic underneath, which then turns a murky black colour if the paint vapour mixes with it. Once it's set up correctly I tend to do a whole load of them by making a simple jig that I can use to drop each one into a repeatable position on the laser's bed. ------------- |
| [top] | |
| fogh1 | Posted: 10 Aug 2022, 04:06 PM |
|
Member Posts: 7 Joined: 9-August 22 |
Thanks for the info! I'll try that next time I can use a laser cutter! ------------- |
| [top] | |
| fogh1 | Posted: 8 Dec 2023, 08:41 PM |
|
Member Posts: 7 Joined: 9-August 22 |
So an update. I tried to do this procedure again using the same Keyestudio board, and I followed the same step I did before, but for some reason this time using the stk500v1 programmer didn't work, and reset the Keyestudio board during the avrdude programming process. If I had to guess this happened because I am running avrdude from a different machine running debian 12, so maybe the code for the stk500v1 programmer has changed. Either way, after doing what other guides suggest, and putting a 10uF capacitor between the ground and reset pins on the Keyestudio, I was ale to flash the ATTiny successfully. If anyone has a suggestion on how to flash without needing the capacitor, let me know! ------------- |
| [top] | |
Sign in to post a reply.