
Musical Greetings Card
6 Jul 2015Progress: Complete
Having achieved a standalone duophonic chiptune player on an ATtiny85, I was taken off guard by a friend's birthday for which I had no present to give. The perfect opportunity to deploy the device, I thought, as a musical greetings card.
Pahaha. Is it possible? Of course it is. In fact it's dead simple given that I'd already written the code. But I'm still amazed that it's possible for an individual to build a musical greetings card from scratch. What a world we live in.
So, one of the bigger challenges with this is trying to get it to reliably play when the card is opened. I went with what I figured was the standard thing to do: a pull tab from one half of the card to the other, that directly cuts the battery when the card is closed.
The Switch
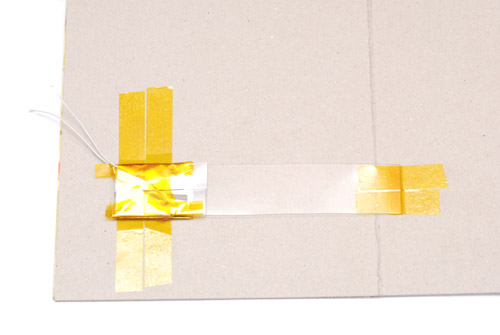
I found some acetate (thin, reasonably rigid, insulating) to be the pull tab. I also took two pieces and glued/kapton taped aluminium foil to them. These would be the contacts.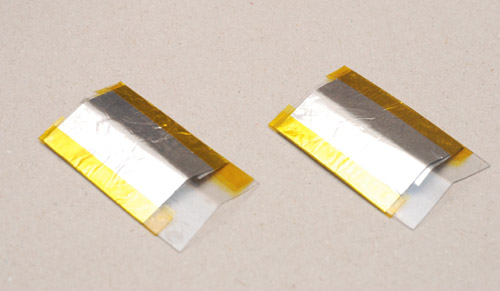
I bent them to be convex and then pressed and taped them together. This means they are normally spring-loaded against each other. The tab then slides between them to break contact. This seemed to work ok.
The Sound
Piezoelectric speakers are very quiet. In fact my choice of card material was based on its audio amplifying qualities. I found it was best to have the rest of the gubbins on the opposite leaf of the card to the speakers, even this wasn't all that loud though. I used two piezos, one for each channel.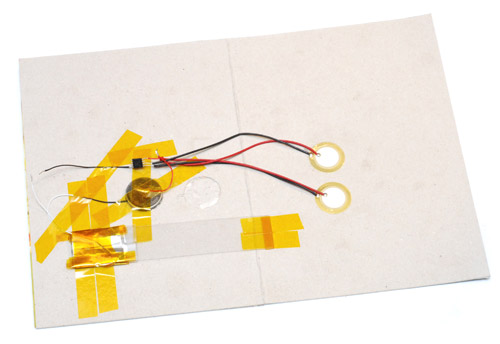
The surface-mount ATtiny85 is the black square. There's a CR2032 battery, they're not the thinnest coin cell but they are the cheapest. I was going to add two (more voltage = more volume, right?) but chickened out when the open-circuit voltage of two cells in series was 7.2V. I guess that drops right down when you start to draw current but it's still way above the 5.5 max rating of the ATtiny85. A few diodes would have dropped it enough, but I was wanting to minimize part counts anyway.
I will spare the reader the final decorations to the card.
The Song
So I asked my friend for whom the card was intended what his favourite video game music was. Naturally I didn't let on what it was for and he made a rather inconvenient choice - the midi file had nine tracks. I actually spent more time muting various parts of the midi file (to make it sound acceptable) than I did building the card to begin with. Hmm... this could be better. But I only started the night before his birthday pubcrawl so there wasn't much else I could do.On the plus side we can quite happily fit a five minute midi file onto the chip's 8kB of flash. I converted it using my old technique (a hacked, butchered version of an older edition of the reverse oscilloscope) with some simple-run length encoding.
The Verdict
The switch was unsatisfactory. It only had about ten cycles in it before it became unreliable. You'd think that's enough, but remember I had a whole morning to myself before giving the card and I kept, err, checking it still worked. Eventually it didn't.The problem was that as soon as the springiness of the acetate had weakened, opening/closing the card just a fraction was enough to momentarily cut the power and reset the song. Perhaps a capacitor would have helped.
In fact I think the best solution would be to avoid mechanics all together. We should have entered sleep mode on the chip and made it play when a circuit is broken - say, a piece of foil on either side of the card. Then, when opened there would be no chance of resetting. The sleep current is measured in microamps and would have been negligible.
Now, here's something I really should have thought of earlier. The piezos were wired from the battery to the output pin. But the timer waveform modes support a differential output, that is, two pins with one being the complement of the other. Wiring a piezo between two pins like that would have effectively doubled the peak-to-peak voltage on it. We'll remember that for next time.
The Improvement
A few weeks passed. Sure, the card had been very well received, but I wasn't personally happy with the duophony. How hard would fully polyphonic be? I'd like to get to a stage where it can play whatever midi file I throw at it, without needing to manually touch it up.For a start we'd need analogue output. The ATtiny85 has an onboard PLL which can clock the timer/PWM at 64MHz, so the PWM period is 125kHz, which should do nicely. So no further parts are needed, just some thinking.
Well, the file format I used for the reduced midi data before isn't going to work for full polyphony, it would be too inefficient. I came up with a better system. If we limit ourselves to just one fully polyphonic channel, it's safe to say that each note can either be on or off, i.e. it cannot be turned on twice for twice the volume. In that case there's no need to differentiate noteOn and noteOff - it's just a noteToggle that we need. A list of noteToggles, and durations between them.
So here's my format: for each byte, if bit 7 is clear, it is a noteToggle message for that notenumber. Otherwise, it is a wait message.
For a variable number of notes on at any time, this is a much better system than the original / what I used in my games console. Good. As for the code, we use the other timer to give us our sample rate. Unfortunately, even with the chip clocked at 16Mhz, the sample rate is quite limited. I am still producing square waves, see, and in this method there is no aliasing - just going out of tune. So to play high pitched notes in tune, we would need to run the interrupt much faster than the ~30kHz we can get. I decided to compromise and limit the range to three octaves, with 8 bit periods. Three polyphonic octaves, mind you.
The interrupt routine has two parts, the first handles the notes that are on. Each is stored as two bytes in ram, the notenumber, and its counter. Bit 7 of the notenumber is used as a flag for the phase of the square wave. For each note that's on, the counter is increased, and if it equals the lookup value for that notenumber, we add/subtract an amplitude amount to/from the output, based on the phase flag. This gives us a basically unlimited number of square wave outputs.
The second half of the routine is only run on each overflow of an incremented register, so much slower. This reads the next frame from the file and turns notes on or off or counts down the wait value. When it reads a noteToggle event, we first need to see if the note is on, by cycling through the ram. If we find it, we go straight to the noteoff/splice routine. Otherwise we can just add that note onto the end of the list. The splicing is quite simple, it just continues from where the note was found and shifts each byte of ram by two places until the end, using the store/load-with-displacement instructions.
Each time a note is turned on or off, we need to add/subtract half its wave amplitude to begin the square wave properly. The choice of amplitude is based on how many notes we expect to play at once. Since the value wraps, it becomes very obvious if the output clips.
And with that, we have achieved fully polyphonic square-wave midi playback. I spose I should show it off!
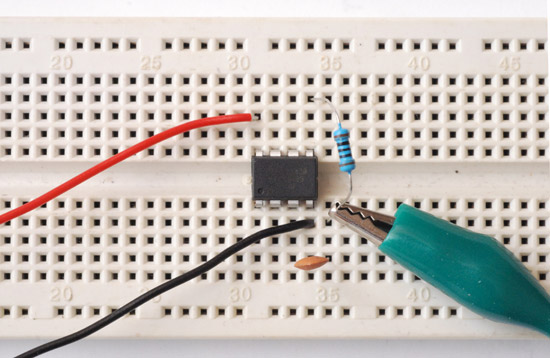
I have heard that unfiltered high-frequency PWM can damage audio equipment. Sounds unlikely but just in case I stuck a resistor/capacitor (100Ω, 0.1uF) on the output. Brings our total component count up to three.
Here's an audio clip. The first result for 'LTTP Dark World' from vgmusic.com, completely unmodified, put through my midi converter and playing back on the ATtiny85. Recorded by putting a mic next to the speakers.
Could do with tidying up but as far as I'm concerned to get a result that good from an untouched nine track midi file is mission accomplished. I ran about forty different midi files through it and they all faired about the same. The only issues are the limit of three octaves, which some of them exceed (it wraps down an octave) and some files with repeated notes without gaps between sound like a single note. In that case you can open it in your favourite midi editor, select all and reduce note length by 10%. Marvellous.
It actually didn't take me all that long to write this, and now I shall be prepared for next time. Unfortunately, polyphony implies a much lower amplitude wave so as to avoid clipping, which means even worse volume for a piezo than before. D'oh!
Since I'm feeling generous, I'll now present to you not only the source code, but also the javascript midi conversion utility. It's an exceedingly butchered edition of the reverse oscilloscope, but don't laugh, it works! In the ASM file, delete everything after the MusicData label and paste the output of the converter there. If the file ends up longer than 8kB, you can delete some of the data and set the last byte to zero if you want it to loop properly. There are some parameters you can play with, and make sure to run the chip at 16Mhz (set Low Fuse to 0xF1) or it'll be an octave down.