
LiPoCheck
10 Nov 2017Progress: Complete
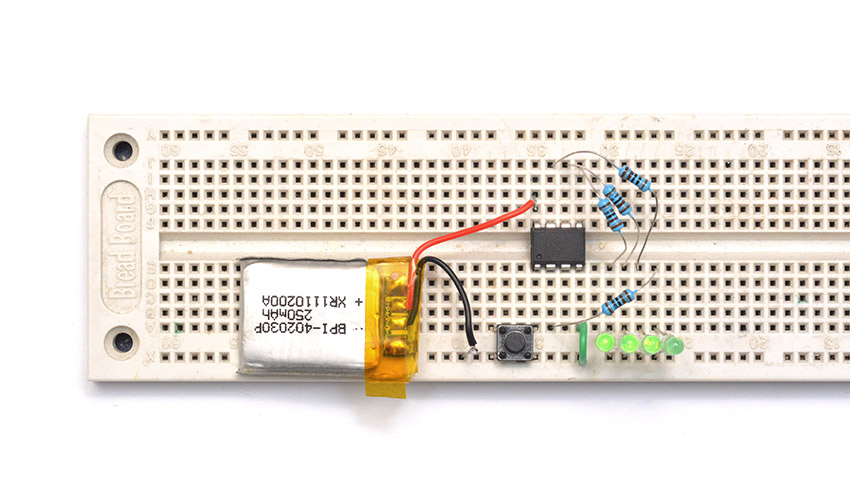
Here's a very simple project I did a few weeks ago. I wanted a standalone circuit that could indicate the charge level of a lithium battery, the kind where you press a button and some LEDs light up for a few seconds to indicate the approximate percentage.
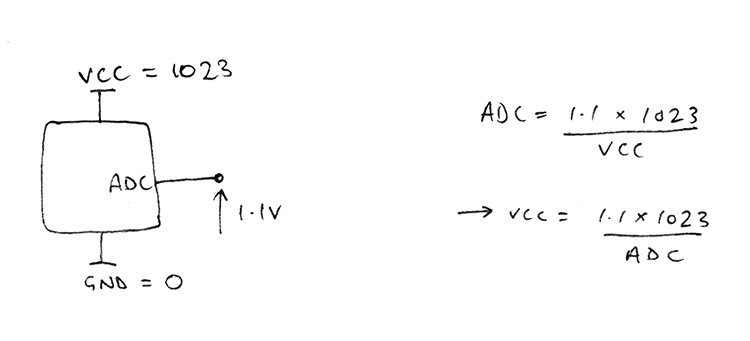
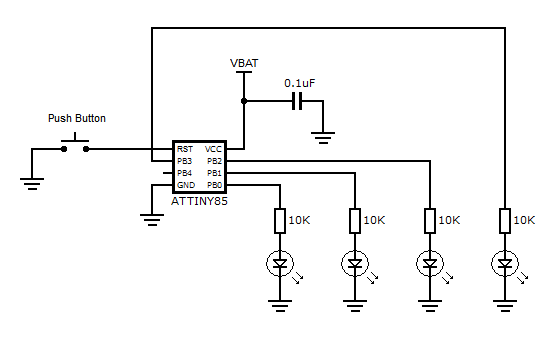
We can do this simply using an ATtiny85. I admit it's overpowered for the task at hand, but it has a very useful built-in band-gap reference voltage, which can be used in a number of ways, one of them being to plug it into the onboard ADC. The 10-bit ADC measures an analog voltage, giving a reading between 0 and 1023, and it can be configured so that 0 represents ground and 1023 represents the supply voltage to the chip. Cleverly, with the multiplexer connecting the ADC channel to the bandgap voltage reference, the value it reads will directly relate to the supply voltage.
All the code has to do is read this, work backwards to the voltage level and illuminate the right number of LEDs. The rest of the time it can sleep, and in fact it can even sleep during the reading stage so as to reduce noise that might affect the reading.
Lithium battery cell voltages range from about 4.2 down to 3, depending a lot on the chemistry, temperature, and the load on the cell. There is quite a complex relationship between the voltage reading and the capacity remaining, though. To get an accurate number, you need to have measured the discharge curve for that cell.
In a future project I might build a testing rig to reliably measure these curves, which would involve charging and discharging the battery at constant current while logging voltage. A simpler result could be gotten by just discharging through a resistor, while logging voltage and current. The current would change throughout the curve, so it wouldn't be quite as accurate, but it might be enough to give an idea. Beware that if you google "lipo discharge curve" there will be two types of graph that pop up: voltage against time, and voltage against capacity. If you've discharged it at constant current, these two curves will be the same shape, otherwise, the measured current will need to be integrated to get the right curve.
A third and possibly more useful option is to log the voltage over time on the actual gadget you are planning to implement the battery meter on. After a full discharge, it might be safe enough to say that at 50% of the time elapsed, the battery was at 50% capacity.
Anyway, for this project, I really did just google "lipo discharge curve" and picked some sensible numbers. For nearly all of the curve, the voltage hovers around 3.7, sharply dropping off to 3 at the end. I put my four LED thresholds at 3.9, 3.75, 3.7 and 3.0 but within the code it's straight forward to type in other values.
Three LEDs illuminated, meaning it's somewhere between 50% and 75% full. They stay lit for about 2 seconds after the button is pressed.
I used 10K resistors which puts them a bit dim; this is on purpose. Drawing too much current, especially from a tiny battery like this, will skew the voltage it reads at and may even cause the display to flicker. It's much better to have actual resistors as opposed to PWMing them, since the digital noise would likely affect the ADC.
The source code is available on github here.