
Recreating the Yamaha BC3a
22 Feb 2015Progress: Complete
A breath controller turns a digital keyboard into a digital melodica.
The Yamaha BC3a was a breath controller for Yamaha keyboards in the 80s. Now that I own an 80s Yamaha keyboard, I have no excuse not to own a breath controller. Unfortunately, the BC3a is no longer made, and there's an alarming number of people willing to pay several hundred pounds for something that's spent thirty years in somebody else's mouth.
Before we go any further, I should mention that there are now standalone USB breath controllers available, new, for around £100. This is mighty tempting but still a little outside my budget - I think we can do better.
The BC input on the keyboard has three pins: power, ground, and signal (maybe 'power' and 'ground' are the wrong words, but they provide a voltage to power the thing). It is possible to stick a potentiometer across the three lines and generate midi data. There are a couple of things to note with this, for one, there is a correctional curve applied (probably logarithmic) so it doesn't just behave like another slider. The other is that 127 is about halfway between the power rails, and zero is at the positive rail. I didn't notice this until much later.
This type of breath controller is just a pressure sensor, and pressure sensors are cheap. What's more, I was delighted to find that you can buy pressure sensors with a built in amplifier, so the output is between 0V and 5V (normally you get a minuscule, differential output that needs amplification). The possibility of buying one of these and wiring it directly to the keyboard without needing other components was certainly attractive.
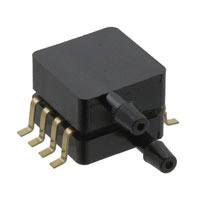
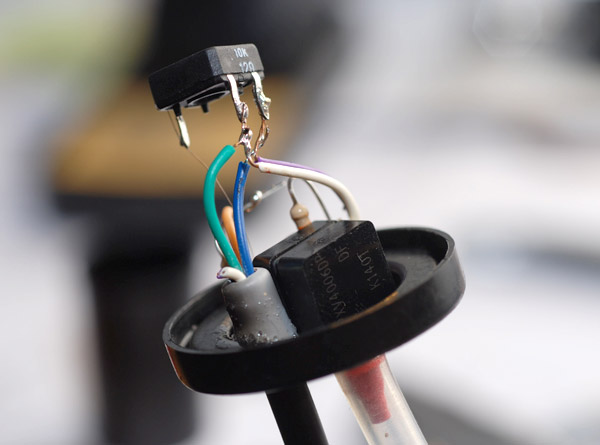
In choosing a sensor, I measured my own breath to see what the maximum pressure was going to be. I could blow about 1.5psi, but that's an unrealistic value to be blowing comfortably for any length of time. Really I would be blowing in the range of maybe 0.3psi, especially if the tube has a calibrated leak to give the feeling of blowing through something. The part I ended up ordering was the Freescale MPXV4006DP, which has a range of 0 to 0.87psi. The DP stands for differential pressure, the gauge pressure model would have been fine, except they were out of stock. Leaving one tube unconnected makes it behave like the GP model. The part cost about £10.
You could, of course, plug this sensor into an Arduino and have a USB breath controller quite easily. It does make you wonder why the commercial breath controllers are so bloody expensive.
With the Yamaha keyboard, when it comes to voltage, normally it would be 9V across the two lines, but since I've modified this keyboard to be powered over USB the most it could provide would be 5V, which conveniently is exactly what the pressure sensor needs. If you are building this yourself, consider that you may need to drop the voltage for your sensor.
So I wired it up and tried it out and found that I'd been hopelessly optimistic in thinking it wouldn't need anything else to work. The fact that it expects a lower voltage at higher pressures isn't catastrophic (we could always invert the midi value in software) but the saturation value being halfway is a killer. It means you have to blow quite hard to get it to leave 127, and then very hard indeed to get down to zero. No two ways about it, we have to do some analogue electronic wizardry.
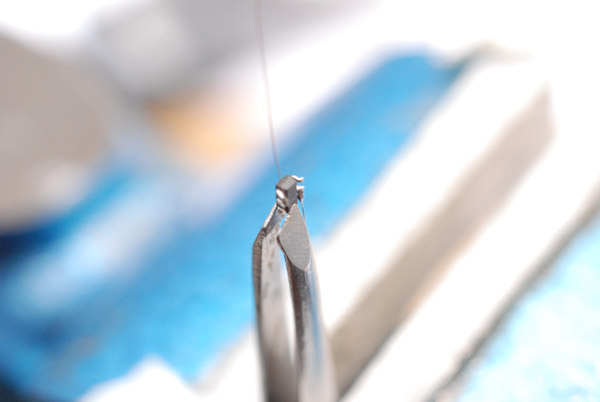
Inverting a voltage with an op-amp is dead simple. However, a complication arises in that most op-amps' output can't reach their power rails, usually plateauing about a volt away. All we have is the 5V from USB, and I was adamant that I wouldn't add another power source, but luckily there are special rail-to-rail op-amps available for this very purpose. I ordered the first result for 'rail-to-rail op-amp' without really looking at it, because bandwidth, slew rate and so on are totally unimportant in this situation. I got two MAX4389 op-amps for £2.79 including postage.
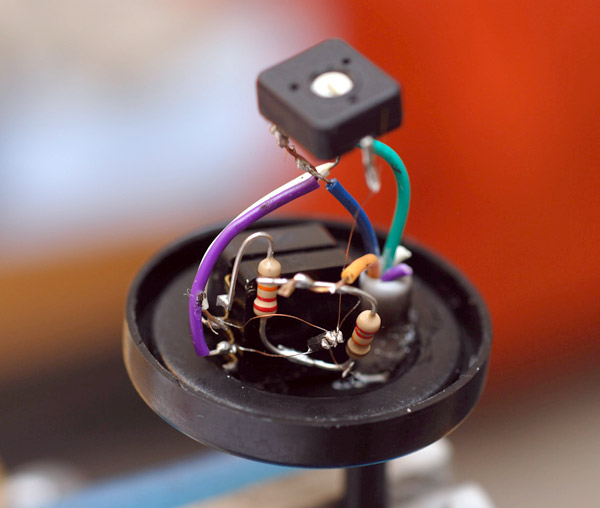
When they arrived I was in for a surprise. They were tiny! I mean, really really tiny. No turning back now, this would have to be a microsoldering job. Taking an ordinary multicore wire, I unwound it and used individual strands to solder to the legs of the tiny package. Here it's held in tweezers held in my little desk vice.
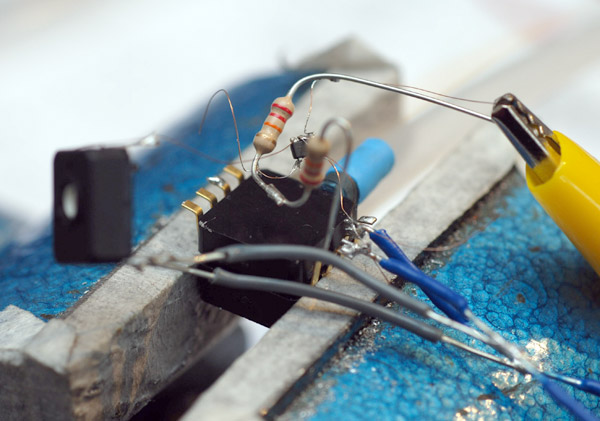
It has a disable pin which needs to be tied to Vcc, luckily they are next to each other. Experimenting isn't easy when it can't be breadboarded, but after a few rearrangements I finally had a working breath controller. The op-amp is hanging between the resistors like a bug caught in a spider's web.
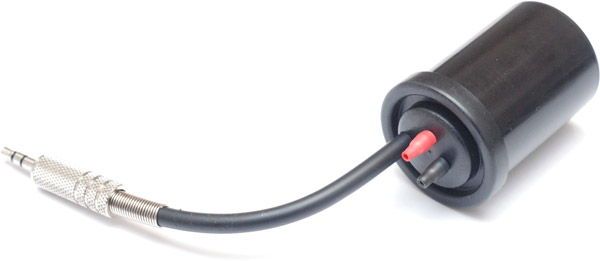
Here's a schematic. "+5V" is connected to SLEEVE, "Vout" is connected to RING, and ground is connected to TIP of the 3.5mm jack.
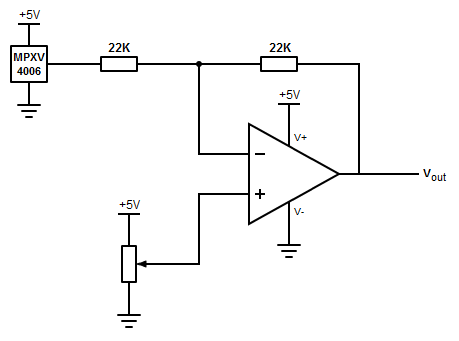
The trimpot is essential for lining the zeros up, because the sensor itself isn't rail-to-rail. You could make the feedback resistor adjustable too, if you wanted to play with the gain, but I found a gain of 1 was just fine. Since it saturates at half output, the pressure range ends up as being 0 to about 0.4psi which is perfect for me.
At one point I was hoping to fit the whole thing inside the plug going to the keyboard, but there was no way that'd be happening now. The most abundant plastic containers I have are film canisters, which would be fine, although not as pretty as having it all within the jack... I drilled a few holes in the lid of a canister and started assembling on it. I made the lead going to the jack quite short, as it can be extended with an ordinary headphone cable.
By adjusting the trimpot on top, you can very finely control the threshold pressure for it to leave zero.
The ports on the sensor stick out and I wrapped them in heatshrink to secure it. The heatshrink is an easy way of making the ports big enough for my silicone tubing to be a push-fit.
The red one is the port to connect to. I suppose there's nothing stopping you connecting to the black one and controlling it via suction.
I'm actually really pleased with this - it wasn't so hard after all. In fact if you go for an op-amp in an ordinary-sized package then this is quite straight forward. I don't have a real BC3a to compare it to, but it behaves as well as I could have hoped.
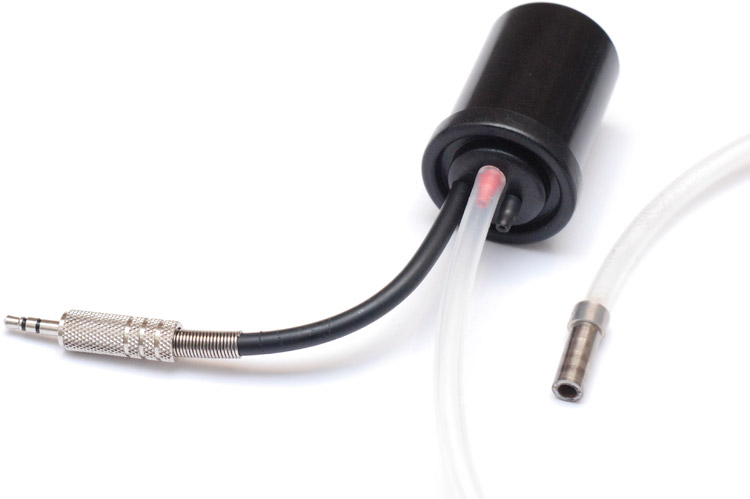
At the moment I'm using it just with one metre of tube and, temporarily, a little piece of stainless pipe as a mouthpiece. When I get hold of a suitable lump of plastic maybe I'll create a deluxe mouthpiece on my lathe. Or, perhaps I should make a headset-style device to connect it to, like the real BC3a. I am unable to notice the effect of the length of the pipe, so it's probably sufficient to build a hollow headset that just extends the tube. Otherwise you could mount the sensor on the headset and extend the wire with an audio cable. The possibilities.
Marvellous. Total cost, maybe £20. Now, on to create breath-controlled patches for my Reverse Oscilloscope!
Update: I've now connected the mouthpiece and tube from my melodica to this. I'm not sure why I didn't think of doing that sooner. It's far more comfortable, and with a deliberate leak it makes it much easier to articulate the flow. You can buy replacement melodica/pianica mouthpieces for very cheap, so if you don't have one I would strongly recommend it.