
| samster395 | Posted: 23 Dec 2023, 06:18 PM |
|---|---|
|
Member Posts: 1 Joined: 23-December 23 |
Firstly, Simple amazing, really didnt expect it to be reprogrammable, wow. great work. I wish it was easier to make something like this, Id love to see more of this type of thing. I saw you published the chip source code, I dont suppose you could publish the PCB files too, Just incase I wanna try :) Also RGB would be amazing!!! ------------- |
| [top] | |
| mit | Posted: 24 Dec 2023, 10:04 PM |
|
yeah whatever Admin Posts: 657 Joined: 4-May 16 |
I'm not sure if the PCB files on their own are enough to recreate it, and I'm not really looking to provide support for people trying it (I am getting a lot of interest and I just don't have time to help everyone asking). Maybe when I make the next version I will think about turning it into a kit or something. ------------- |
| [top] | |
| 0xRoM2 | Posted: 28 Dec 2023, 12:44 AM |
|
Member Posts: 1 Joined: 28-December 23 |
This scaffold is awesome! I made something similar a few years ago: https://youtu.be/rTGEKObuSYc?si=R5H06oVlcZybWWGd (skip to like 40 secs in) Is for 10mm hole (seems to be most common size, and is for my ear hole) For the current revision I got a battery from one of those old cheap business persons bluetooth headset you can get in any pound shop, works a treat, is also hidden behind the ear. Last edit by 0xRoM2 at 28 Dec 2023, 12:45 AM ------------- |
| [top] | |
| mit | Posted: 28 Dec 2023, 11:23 PM |
|
yeah whatever Admin Posts: 657 Joined: 4-May 16 |
Very nice. How do you replace/charge the battery? An idea I've been toying with, since you can get LIR2032 batteries and chargers, is to make an earring similar to my charliestar (which could also function as a plug) with a tiny rechargeable battery, but connect the two metal plates to the battery terminals, so the whole thing can be recharged by inserting it into a LIR2032 charger. I suppose it doesn't save much over a dedicated charger, since most people don't have that type of charger to begin with, but it's still an appealing idea. ------------- |
| [top] | |
| 0xRoM | Posted: 29 Dec 2023, 07:26 AM |
|
Member Posts: 2 Joined: 28-December 23 |
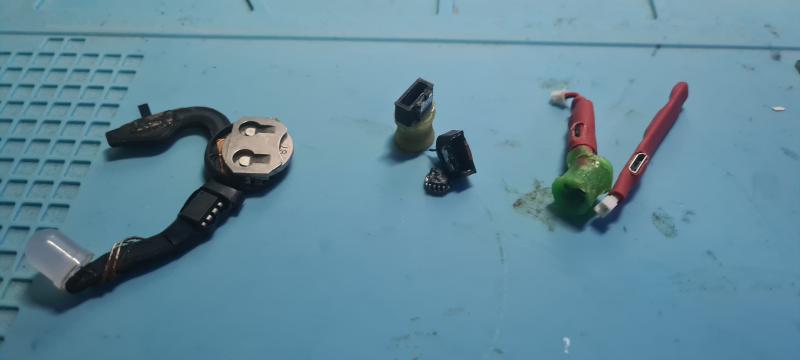
 So the version on the left was like a cuff worn on the ear and the 10mm LED you fed through ear hole from the back. Was cool, but 1 colour and kinda uncomfey. could do with some padding. the middle one is an upgrade from the one in the video, instead of 3d printing the plug I instead 3d printed a mould in abs (flexible stuff) and used that to fill with resin. The little battery holder is 3d printed and simply one wire poking through a hole in the bottom to contact the edge of the battery and some copper tape on the inside to contact the edge. The right one is resin with the bluetooth headset battery, it came with a charger (the bit on the right) so just tore that down and shrink wrapped :) ------------- |
| [top] | |
| vacho | Posted: 4 Jan 2024, 01:13 AM |
|
Member Posts: 1 Joined: 4-January 24 |
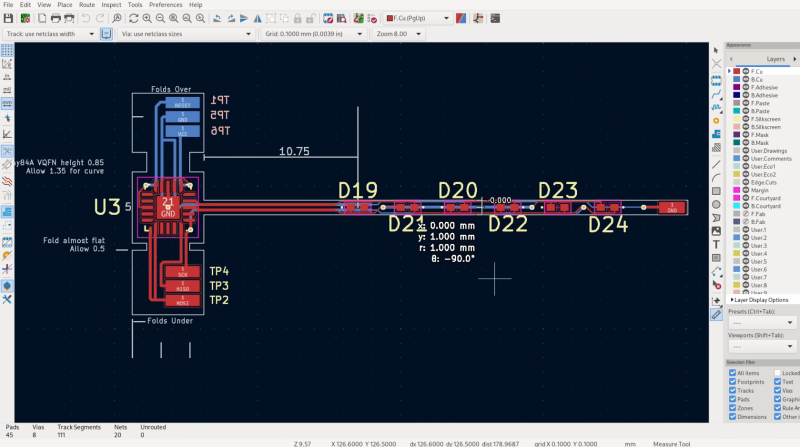
Does anyone know what programm mitxela yoused to model the curcuit board for the scaffold? I am looking forward to also start with projects like these but I still need the right software. For reference, here is a screenshot out of mitxela 's video from the software I am looking for: ------------- |
| [top] | |
| mit | Posted: 4 Jan 2024, 03:26 PM |
|
yeah whatever Admin Posts: 657 Joined: 4-May 16 |
KiCad ------------- |
| [top] | |
| newto | Posted: 5 Jan 2024, 03:51 AM |
|
Member Posts: 2 Joined: 5-January 24 |
Got sucked into your channel after being suggested this video, and I really enjoy all the micro designs. Definitely scratched an itch, makes me want to try a similar project! I don't know if I'll actually go for it, but I've been looking into if an RGB version was possible. The obvious path is definitely mini neopixels: https://www.adafruit.com/product/4892, although that would definitely need to up to a 14ga needle diameter (cursory googling says 14ga is actually more common than 16ga for industrial piercings, so not unreasonable), but would still be very tight. They'd also need voltages above 3.7V, so it would need another battery, or a tiiiny boost converter. Found a few options for non-addressable RGB LEDs, but there's no way you're fitting that many traces (and vias, and pads) into 1mm, so some kind of folding of the flex PCB would be needed, either in parallel, or doubled back from the battery end. Also not sure if "charlieplexing" would work well, since that would potentially limit which colours could be shown together, and total brightness, since you need to control 18 LEDs (assuming you stick with 6 positions. And of course batteries! Sadly can't seem to find any rechargeable battery in a reasonable form factor, unless you're okay with less than an hour of light... Definitely an interesting puzzle, I don't actually know anyone with this type of piercing, so maybe a different form factor if I actually want to build something similar (necklace or earring like your charliestar), so that I could fit a larger rechargeable cell inside. Last edit by newto at 5 Jan 2024, 03:55 AM ------------- |
| [top] | |
| mit | Posted: 5 Jan 2024, 01:50 PM |
|
yeah whatever Admin Posts: 657 Joined: 4-May 16 |
My mention of RGB was alluding to the fact you can now get WS2812 in a metric 1010 format (1mm square). The voltages / battery is still a problem though. ------------- |
| [top] | |
| newto | Posted: 5 Jan 2024, 02:45 PM |
|
Member Posts: 2 Joined: 5-January 24 |
Huh, somehow completely missed that those 1mm LEDs existed, should have checked lcsc first I guess. Definitely makes the LED section a lot easier, but would need either a third cell or something to boost the voltage ------------- |
| [top] | |
Sign in to post a reply.