| somnim00 | Posted: 18 Nov 2018, 09:15 AM |
|---|

Member
Posts: 7
Joined: 10-September 18
|
Sorry If I'm writing in wronng place.
but.. I need help..
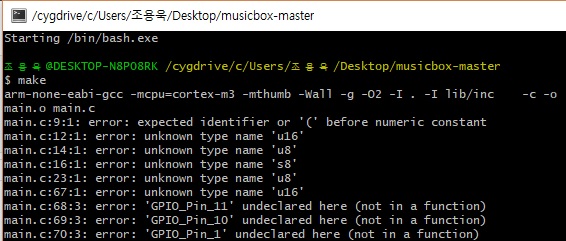
When I use make
https://github.com/mitxela/musicbox
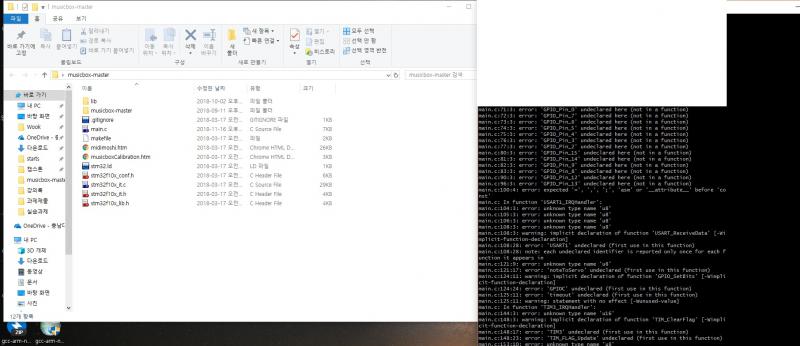
this file, I got error messages about u8 etc..
and... I think there is another header file
please help about it..
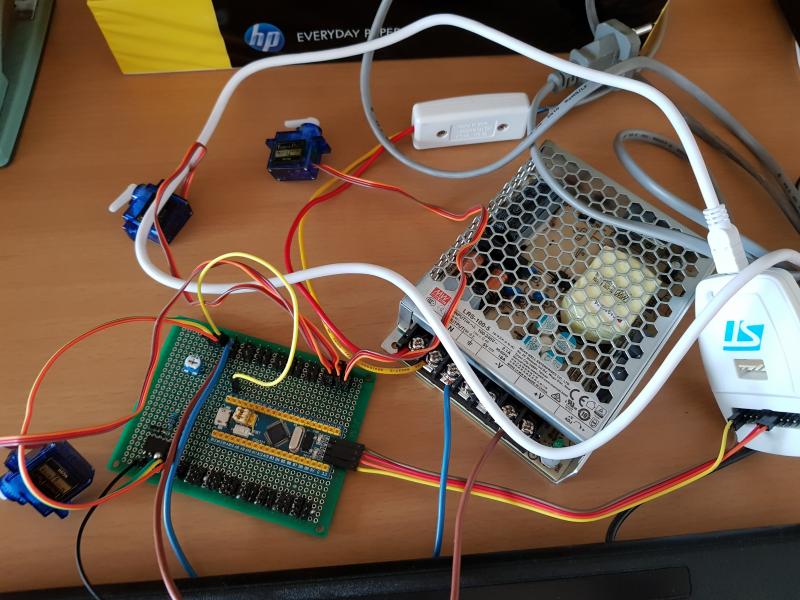
I did laser cutting, soldering , almost everything
It was took a lot of time.
So.. I don't wanna finish this project here...
PLEASE HELP MITXELA.. you are most genius person I've ever seen.
-------------
|
| [top] |
|
| DAVID | Posted: 18 Nov 2018, 02:31 PM |
|---|
I love mcus
Member
Posts: 237
Joined: 10-September 17
|
which compiler did you use?
-------------
|
| [top] |
|
| fyodorKrasniy | Posted: 19 Nov 2018, 02:23 AM |
|---|

Member
Posts: 1
Joined: 19-November 18
|
Heya, yeah, we too did the lasering and got all the hardware sorted, just cant figure out how to actually upload the code to the bluepill controller board. Would you be able to also explain how that works?
-------------
|
| [top] |
|
| somnim00 | Posted: 19 Nov 2018, 05:20 AM |
|---|
Member
Posts: 7
Joined: 10-September 18
|
I used make and gcc with cygwin, arm-gcc toolchain
I don't know how to upload the code...
-------------
|
| [top] |
|
| mit | Posted: 19 Nov 2018, 03:11 PM |
|---|
yeah whatever
Admin
Posts: 687
Joined: 4-May 16
|
Hi guys, I'm sure we can get this working.
I don't know what's causing the errors about u8, u16, but these errors tend to cascade, that means all of the errors are just caused by the very first one. It says there's an unexpected identifier before numeric constant on line 9. Are you sure you haven't changed the files at all?
I just tried it again, here's what I got: (lots of warnings from the peripheral library, but no errors)
# git clone https://github.com/mitxela/musicbox.git
Cloning into 'musicbox'...
remote: Enumerating objects: 77, done.
remote: Total 77 (delta 0), reused 0 (delta 0), pack-reused 77
Unpacking objects: 100% (77/77), done.
# cd musicbox/
# make
arm-none-eabi-gcc -mcpu=cortex-m3 -mthumb -Wall -g -O2 -I . -I lib/inc    -c -o main.o main.c
arm-none-eabi-gcc -mcpu=cortex-m3 -mthumb -Wall -g -O2 -I . -I lib/inc    -c -o stm32f10x_it.o stm32f10x_it.c
arm-none-eabi-gcc -mcpu=cortex-m3 -mthumb -Wall -g -O2 -I . -I lib/inc    -c -o lib/src/stm32f10x_adc.o lib/src/stm32f10x_adc.c
lib/src/stm32f10x_adc.c: In function 'ADC_DeInit':
lib/src/stm32f10x_adc.c:135:3: warning: dereferencing type-punned pointer will break strict-aliasing rules [-Wstrict-aliasing]
   switch (*(u32*)&ADCx)
   ^
lib/src/stm32f10x_adc.c: In function 'ADC_SetInjectedOffset':
lib/src/stm32f10x_adc.c:1106:3: warning: dereferencing type-punned pointer will break strict-aliasing rules [-Wstrict-aliasing]
   *((vu32 *)((*(u32*)&ADCx) + ADC_InjectedChannel)) = (u32)Offset;
   ^
lib/src/stm32f10x_adc.c: In function 'ADC_GetInjectedConversionValue':
lib/src/stm32f10x_adc.c:1129:3: warning: dereferencing type-punned pointer will break strict-aliasing rules [-Wstrict-aliasing]
   return (u16) (*(vu32*) (((*(u32*)&ADCx) + ADC_InjectedChannel + JDR_Offset)));
   ^
arm-none-eabi-gcc -mcpu=cortex-m3 -mthumb -Wall -g -O2 -I . -I lib/inc    -c -o lib/src/stm32f10x_bkp.o lib/src/stm32f10x_bkp.c
arm-none-eabi-gcc -mcpu=cortex-m3 -mthumb -Wall -g -O2 -I . -I lib/inc    -c -o lib/src/stm32f10x_can.o lib/src/stm32f10x_can.c
arm-none-eabi-gcc -mcpu=cortex-m3 -mthumb -Wall -g -O2 -I . -I lib/inc    -c -o lib/src/stm32f10x_dma.o lib/src/stm32f10x_dma.c
lib/src/stm32f10x_dma.c: In function 'DMA_DeInit':
lib/src/stm32f10x_dma.c:83:3: warning: dereferencing type-punned pointer will break strict-aliasing rules [-Wstrict-aliasing]
   switch (*(u32*)&DMAy_Channelx)
   ^
arm-none-eabi-gcc -mcpu=cortex-m3 -mthumb -Wall -g -O2 -I . -I lib/inc    -c -o lib/src/stm32f10x_exti.o lib/src/stm32f10x_exti.c
arm-none-eabi-gcc -mcpu=cortex-m3 -mthumb -Wall -g -O2 -I . -I lib/inc    -c -o lib/src/stm32f10x_flash.o lib/src/stm32f10x_flash.c
arm-none-eabi-gcc -mcpu=cortex-m3 -mthumb -Wall -g -O2 -I . -I lib/inc    -c -o lib/src/stm32f10x_gpio.o lib/src/stm32f10x_gpio.c
lib/src/stm32f10x_gpio.c: In function 'GPIO_DeInit':
lib/src/stm32f10x_gpio.c:56:3: warning: dereferencing type-punned pointer will break strict-aliasing rules [-Wstrict-aliasing]
   switch (*(u32*)&GPIOx)
   ^
arm-none-eabi-gcc -mcpu=cortex-m3 -mthumb -Wall -g -O2 -I . -I lib/inc    -c -o lib/src/stm32f10x_i2c.o lib/src/stm32f10x_i2c.c
lib/src/stm32f10x_i2c.c: In function 'I2C_DeInit':
lib/src/stm32f10x_i2c.c:117:3: warning: dereferencing type-punned pointer will break strict-aliasing rules [-Wstrict-aliasing]
   switch (*(u32*)&I2Cx)
   ^
lib/src/stm32f10x_i2c.c: In function 'I2C_ReadRegister':
lib/src/stm32f10x_i2c.c:648:3: warning: dereferencing type-punned pointer will break strict-aliasing rules [-Wstrict-aliasing]
   return (*(vu16 *)(*((vu32 *)&I2Cx) + I2C_Register));
   ^
lib/src/stm32f10x_i2c.c: In function 'I2C_GetFlagStatus':
lib/src/stm32f10x_i2c.c:1016:3: warning: dereferencing type-punned pointer will break strict-aliasing rules [-Wstrict-aliasing]
   i2cxbase = (*(u32*)&(I2Cx));
   ^
arm-none-eabi-gcc -mcpu=cortex-m3 -mthumb -Wall -g -O2 -I . -I lib/inc    -c -o lib/src/stm32f10x_iwdg.o lib/src/stm32f10x_iwdg.c
arm-none-eabi-gcc -mcpu=cortex-m3 -mthumb -Wall -g -O2 -I . -I lib/inc    -c -o lib/src/stm32f10x_lib.o lib/src/stm32f10x_lib.c
arm-none-eabi-gcc -mcpu=cortex-m3 -mthumb -Wall -g -O2 -I . -I lib/inc    -c -o lib/src/stm32f10x_nvic.o lib/src/stm32f10x_nvic.c
arm-none-eabi-gcc -mcpu=cortex-m3 -mthumb -Wall -g -O2 -I . -I lib/inc    -c -o lib/src/stm32f10x_pwr.o lib/src/stm32f10x_pwr.c
arm-none-eabi-gcc -mcpu=cortex-m3 -mthumb -Wall -g -O2 -I . -I lib/inc    -c -o lib/src/stm32f10x_rcc.o lib/src/stm32f10x_rcc.c
arm-none-eabi-gcc -mcpu=cortex-m3 -mthumb -Wall -g -O2 -I . -I lib/inc    -c -o lib/src/stm32f10x_rtc.o lib/src/stm32f10x_rtc.c
arm-none-eabi-gcc -mcpu=cortex-m3 -mthumb -Wall -g -O2 -I . -I lib/inc    -c -o lib/src/stm32f10x_spi.o lib/src/stm32f10x_spi.c
lib/src/stm32f10x_spi.c: In function 'SPI_I2S_DeInit':
lib/src/stm32f10x_spi.c:67:3: warning: dereferencing type-punned pointer will break strict-aliasing rules [-Wstrict-aliasing]
   switch (*(u32*)&SPIx)
   ^
arm-none-eabi-gcc -mcpu=cortex-m3 -mthumb -Wall -g -O2 -I . -I lib/inc    -c -o lib/src/stm32f10x_systick.o lib/src/stm32f10x_systick.c
arm-none-eabi-gcc -mcpu=cortex-m3 -mthumb -Wall -g -O2 -I . -I lib/inc    -c -o lib/src/stm32f10x_tim.o lib/src/stm32f10x_tim.c
lib/src/stm32f10x_tim.c: In function 'TIM_DeInit':
lib/src/stm32f10x_tim.c:139:3: warning: dereferencing type-punned pointer will break strict-aliasing rules [-Wstrict-aliasing]
   switch (*(u32*)&TIMx)
   ^
lib/src/stm32f10x_tim.c: In function 'TIM_TimeBaseInit':
lib/src/stm32f10x_tim.c:218:3: warning: dereferencing type-punned pointer will break strict-aliasing rules [-Wstrict-aliasing]
   if (((*(u32*)&TIMx) == TIM1_BASE) || ((*(u32*)&TIMx) == TIM8_BASE))
   ^
lib/src/stm32f10x_tim.c:218:3: warning: dereferencing type-punned pointer will break strict-aliasing rules [-Wstrict-aliasing]
lib/src/stm32f10x_tim.c: In function 'TIM_OC1Init':
lib/src/stm32f10x_tim.c:277:3: warning: dereferencing type-punned pointer will break strict-aliasing rules [-Wstrict-aliasing]
   if((*(u32*)&TIMx == TIM1_BASE) || (*(u32*)&TIMx == TIM8_BASE))
   ^
lib/src/stm32f10x_tim.c:277:3: warning: dereferencing type-punned pointer will break strict-aliasing rules [-Wstrict-aliasing]
lib/src/stm32f10x_tim.c: In function 'TIM_OC2Init':
lib/src/stm32f10x_tim.c:368:3: warning: dereferencing type-punned pointer will break strict-aliasing rules [-Wstrict-aliasing]
   if((*(u32*)&TIMx == TIM1_BASE) || (*(u32*)&TIMx == TIM8_BASE))
   ^
lib/src/stm32f10x_tim.c:368:3: warning: dereferencing type-punned pointer will break strict-aliasing rules [-Wstrict-aliasing]
lib/src/stm32f10x_tim.c: In function 'TIM_OC3Init':
lib/src/stm32f10x_tim.c:460:3: warning: dereferencing type-punned pointer will break strict-aliasing rules [-Wstrict-aliasing]
   if((*(u32*)&TIMx == TIM1_BASE) || (*(u32*)&TIMx == TIM8_BASE))
   ^
lib/src/stm32f10x_tim.c:460:3: warning: dereferencing type-punned pointer will break strict-aliasing rules [-Wstrict-aliasing]
lib/src/stm32f10x_tim.c: In function 'TIM_OC4Init':
lib/src/stm32f10x_tim.c:552:3: warning: dereferencing type-punned pointer will break strict-aliasing rules [-Wstrict-aliasing]
   if((*(u32*)&TIMx == TIM1_BASE) || (*(u32*)&TIMx == TIM8_BASE))
   ^
lib/src/stm32f10x_tim.c:552:3: warning: dereferencing type-punned pointer will break strict-aliasing rules [-Wstrict-aliasing]
lib/src/stm32f10x_tim.c: In function 'TIM_SelectOCxM':
lib/src/stm32f10x_tim.c:2335:5: warning: dereferencing type-punned pointer will break strict-aliasing rules [-Wstrict-aliasing]
     *((vu32 *)((*(u32*)&TIMx) + CCMR_Offset + (TIM_Channel>>1))) &= CCMR_OC13M_Mask;
     ^
lib/src/stm32f10x_tim.c:2338:5: warning: dereferencing type-punned pointer will break strict-aliasing rules [-Wstrict-aliasing]
     *((vu32 *)((*(u32*)&TIMx) + CCMR_Offset + (TIM_Channel>>1))) |= TIM_OCMode;
     ^
lib/src/stm32f10x_tim.c:2344:5: warning: dereferencing type-punned pointer will break strict-aliasing rules [-Wstrict-aliasing]
     *((vu32 *)((*(u32*)&TIMx) + CCMR_Offset + ((u16)(TIM_Channel - 4)>> 1))) &= CCMR_OC24M_Mask;
     ^
lib/src/stm32f10x_tim.c:2347:5: warning: dereferencing type-punned pointer will break strict-aliasing rules [-Wstrict-aliasing]
     *((vu32 *)((*(u32*)&TIMx) + CCMR_Offset + ((u16)(TIM_Channel - 4)>> 1))) |= (u16)(TIM_OCMode << 8);
     ^
arm-none-eabi-gcc -mcpu=cortex-m3 -mthumb -Wall -g -O2 -I . -I lib/inc    -c -o lib/src/stm32f10x_tim1.o lib/src/stm32f10x_tim1.c
arm-none-eabi-gcc -mcpu=cortex-m3 -mthumb -Wall -g -O2 -I . -I lib/inc    -c -o lib/src/stm32f10x_usart.o lib/src/stm32f10x_usart.c
lib/src/stm32f10x_usart.c: In function 'USART_DeInit':
lib/src/stm32f10x_usart.c:95:3: warning: dereferencing type-punned pointer will break strict-aliasing rules [-Wstrict-aliasing]
   switch (*(u32*)&USARTx)
   ^
lib/src/stm32f10x_usart.c: In function 'USART_Init':
lib/src/stm32f10x_usart.c:159:3: warning: dereferencing type-punned pointer will break strict-aliasing rules [-Wstrict-aliasing]
   usartxbase = (*(u32*)&USARTx);
   ^
lib/src/stm32f10x_usart.c: In function 'USART_ITConfig':
lib/src/stm32f10x_usart.c:365:3: warning: dereferencing type-punned pointer will break strict-aliasing rules [-Wstrict-aliasing]
   usartxbase = (*(u32*)&(USARTx));
   ^
arm-none-eabi-gcc -mcpu=cortex-m3 -mthumb -Wall -g -O2 -I . -I lib/inc    -c -o lib/src/stm32f10x_wwdg.o lib/src/stm32f10x_wwdg.c
arm-none-eabi-gcc -mcpu=cortex-m3 -mthumb -Wall -g -O2 -c  -o lib/src/cortexm3_macro.o lib/src/cortexm3_macro.s
arm-none-eabi-gcc -mcpu=cortex-m3 -mthumb -Wall -g -O2 -I . -I lib/inc    -c -o lib/src/stm32f10x_vector.o lib/src/stm32f10x_vector.c
lib/src/stm32f10x_vector.c:59:3: warning: taking address of expression of type 'void'
   &_estack,            // The initial stack pointer
   ^
lib/src/stm32f10x_vector.c:132:3: warning: initialization makes pointer from integer without a cast [-Wint-conversion]
   (unsigned short)0xF108F85F //this is a workaround for boot in RAM mode.
   ^
lib/src/stm32f10x_vector.c:132:3: note: (near initialization for 'g_pfnVectors[76]')
arm-none-eabi-ar cr lib/libstm32.a lib/src/stm32f10x_adc.o lib/src/stm32f10x_bkp.o lib/src/stm32f10x_can.o lib/src/stm32f10x_dma.o lib/src/stm32f10x_exti.o lib/src/stm32f10x_flash.o lib/src/stm32f10x_gpio.o lib/src/stm32f10x_i2c.o lib/src/stm32f10x_iwdg.o lib/src/stm32f10x_lib.o lib/src/stm32f10x_nvic.o lib/src/stm32f10x_pwr.o lib/src/stm32f10x_rcc.o lib/src/stm32f10x_rtc.o lib/src/stm32f10x_spi.o lib/src/stm32f10x_systick.o lib/src/stm32f10x_tim.o lib/src/stm32f10x_tim1.o lib/src/stm32f10x_usart.o lib/src/stm32f10x_wwdg.o lib/src/cortexm3_macro.o lib/src/stm32f10x_vector.o
arm-none-eabi-gcc -Wl,--gc-sections,-Map=main.elf.map,-cref,-u,Reset_Handler -I . -I lib/inc  -L lib -T stm32.ld main.o stm32f10x_it.o lib/libstm32.a --output main.elf
arm-none-eabi-objcopy -O binary main.elf main.bin
#
Unless you do "make clean" you generally never see those warnings again. Since you got those errors, your ARM-GCC toolchain must be installed correctly I think. So try again from scratch is all I can suggest.
QUOTE (fyodorKrasniy) Heya, yeah, we too did the lasering and got all the hardware sorted, just cant figure out how to actually upload the code to the bluepill controller board. Would you be able to also explain how that works?
I used the ST-LINK utility with an ST-LINK V2 clone programmer. There are other ways though (looks like the programmer in somnim00's picture is an official one, which probably works better)
As you can see in the makefile I used ST-LINK_CLI.exe on windows. I had to change this line in the makefile to get it to work on debian. Not only that, but there are different versions of ST-LINK Utility which take different parameters!
In addition, once you have flashed the code, because I am using ALL of the GPIO pins, I disabled the debug pins and the ST-LINK won't work unless you reset the chip first.
There is another way of flashing the chip, you can use the bootloader. I didn't try this for the music box project but I have done it with other projects. You need STMFlashLoader (or stm32Loader), put the chip into bootloader mode by moving the boot0 jumper, then reset the chip. You can then flash it either via the USB port, or over UART, or a number of other ways.
-------------
|
| [top] |
|
| mit | Posted: 19 Nov 2018, 03:44 PM |
|---|
yeah whatever
Admin
Posts: 687
Joined: 4-May 16
|
I just looked through the emails you sent me, sorry for not replying, I've been really busy.
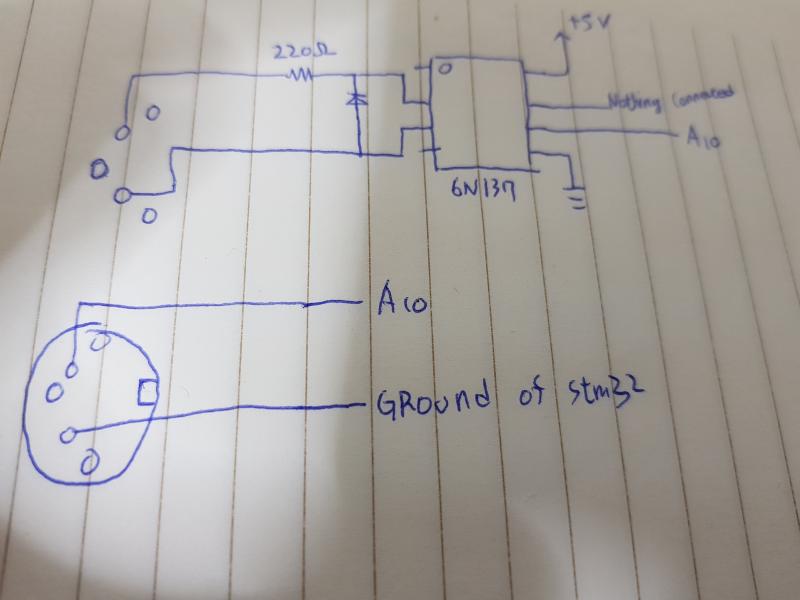
About the schematic, it's quite possible I made a mistake in drawing it, I wasn't particularly careful and it probably doesn't matter. The MIDI end is based on the original midi spec (see here). Pullup resistors are just there to keep the line high when it's not active. Modern microcontrollers like the STM32F103 have internal pullups on their pins that you can enable through software. Also, modern optoisolators probably behave better than the ones in the 1980s.
Diode values probably don't matter.
Again the circuit was built through trial and error so you might have to adjust it to get it right.
I didn't use Keil or anything else like that, just notepad++ and arm-gcc.
I don't want to discourage you, but I was thinking maybe you could try a half-size music box? You can get the music boxes with only 15 notes, so you would only need 15 servos and then you could probably drive them with a microcontroller that's easier to use. Also much less wire bending and soldering to do!
-------------
|
| [top] |
|
| somnim00 | Posted: 19 Nov 2018, 11:12 PM |
|---|
Member
Posts: 7
Joined: 10-September 18
|
I can't be happier than this moments.
when I woke up, and saw your messages, without hesitation
I've ran to my board, and followed your detailed answer.
And succeed to uploading main.bin with stm32 st_link.
Now, my board lost connection and doing it's job.
I didn't finish soldering midi circuit.
after I finish it, and send midi signal, I will post the result.
and...
I am really grateful for your reply to me during your busy time.
I hope that all of your things will go well.
Last edit by somnim00 at 19 Nov 2018, 11:14 PM -------------
|
| [top] |
|
| somnim00 | Posted: 21 Nov 2018, 11:34 AM |
|---|
Member
Posts: 7
Joined: 10-September 18
|
Circuit was completed. So I've sent midi signal with MIDIOX
But.. there is nothing move.
I've checked the midi signal, midi input circuit
I can't find what's problem.
I have a question..
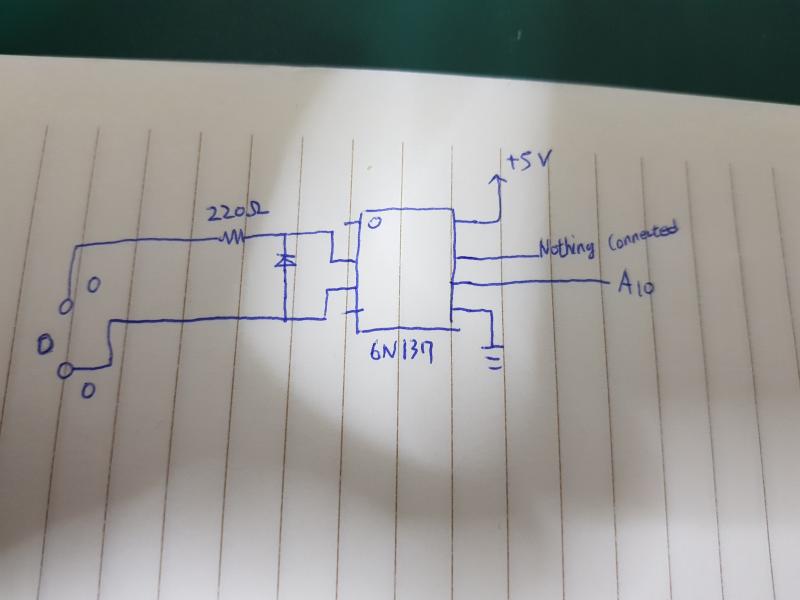
I wonder what did you uses in capacitor and transistor
I checked the left part of 6n137 and it was fine.
The signal was coming.
But right part and number 6 pin of 6n137 is weird.
I can't check it's voltage.
Last edit by somnim00 at 21 Nov 2018, 06:01 PM -------------
|
| [top] |
|
| DAVID | Posted: 21 Nov 2018, 09:34 PM |
|---|
I love mcus
Member
Posts: 237
Joined: 10-September 17
|
if you are using a usb to midi converter you can make it really easy connection (just for testing) connecting both ground points together and the midi out with a resistor to the rx pin of the STM32
-------------
|
| [top] |
|
| somnim00 | Posted: 22 Nov 2018, 01:24 PM |
|---|
Member
Posts: 7
Joined: 10-September 18
|
How can I check my board have downloaded code completely?
Does it right that downloading main.bin to my board with stm32 link?
A10 pin is not in high state, and c13 too
Is this right?
Last edit by somnim00 at 22 Nov 2018, 04:54 PM -------------
|
| [top] |
|
| mit | Posted: 22 Nov 2018, 06:26 PM |
|---|
yeah whatever
Admin
Posts: 687
Joined: 4-May 16
|
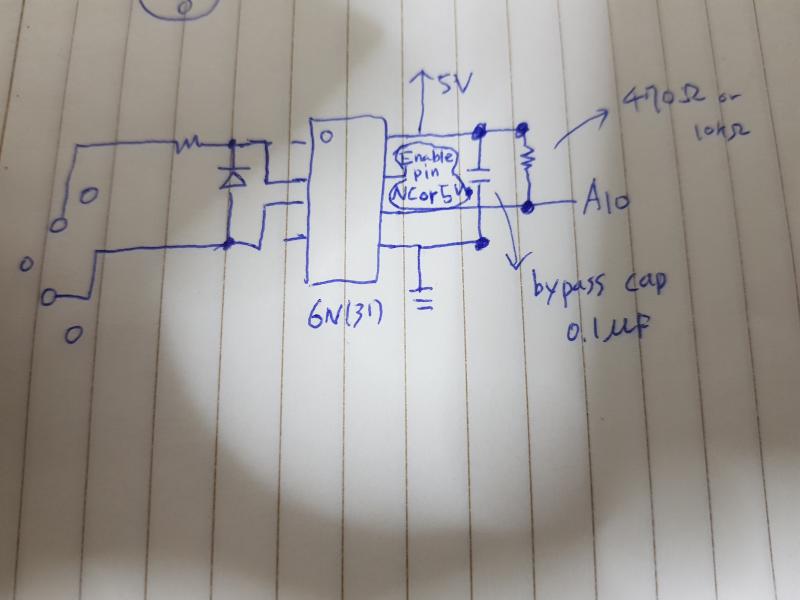
I think that's the enable pin, so you probably need it connected to 5v, there may or may not be an internal pullup. Check the datasheet for the 6n137.
You may also need a pullup resistor on the line going to A10, depending on whether the stm32's internal pullup is enabled (I can't remember).
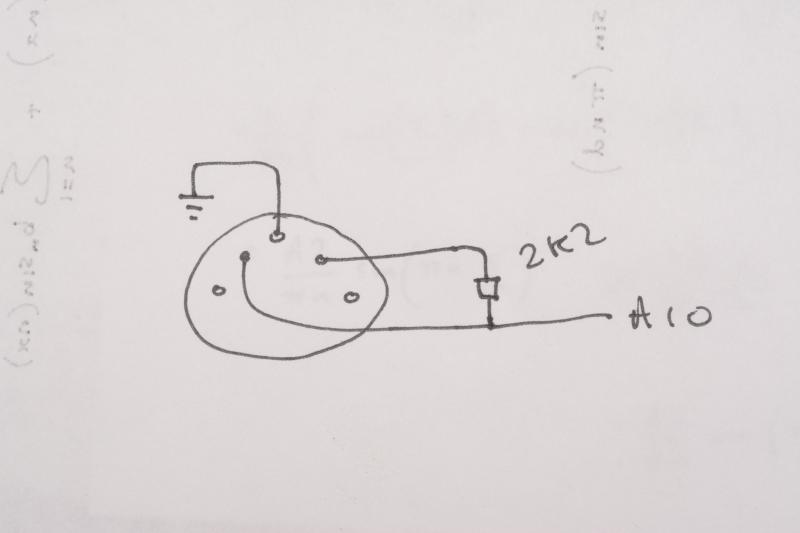
As David said, you can skip the optoisolator if both your circuit and MIDI source are running from the same ground.
The green LED on the STM32 board is connected to C13, so you might want to try out a simple program to blink the LED just to make sure the program is downloading properly. Also, when MIDI data is received on the music box, the LED turns off while the motor is on, so that should tell you if it's understanding the MIDI data.
I would strongly recommend using an oscilloscope if you have access to one, so you can see what the signals are like. It makes debugging much easier.
-------------
|
| [top] |
|
| somnim00 | Posted: 22 Nov 2018, 07:52 PM |
|---|
Member
Posts: 7
Joined: 10-September 18
|
I didnt saw that stm32 board's led turn on when I feed with 5V power supply.
It's only turn on when I connect it to st-link v2
this is right?
And.. midi without optocoupler means..
This?
-------------
|
| [top] |
|
| mit | Posted: 22 Nov 2018, 08:41 PM |
|---|
yeah whatever
Admin
Posts: 687
Joined: 4-May 16
|
QUOTE (somnim00) I didnt saw that stm32 board's led turn on when I feed with 5V power supply.
It's only turn on when I connect it to st-link v2
Yeah it should turn on when fed with the 5V supply. There is a pin labelled 5V on the blue board, that should be linked with the main 5V from the power supply.
MIDI without optocoupler would be like this:
The signal is on the pin on the left (looking into the plug) but it's open drain, meaning it needs a resistor to pull it high when the transistor isn't active. The ground is on the centre pin. But try and get the optocoupler to work I'd say, make sure everything is powered up at least.
-------------
|
| [top] |
|
| somnim00 | Posted: 23 Nov 2018, 05:44 AM |
|---|
Member
Posts: 7
Joined: 10-September 18
|
I've succeeded to one servo moving.
Last edit by somnim00 at 30 Jan 2019, 03:28 PM -------------
|
| [top] |
|
| mit | Posted: 1 Feb 2019, 10:25 PM |
|---|
yeah whatever
Admin
Posts: 687
Joined: 4-May 16
|
Hi, seems like progress.
I notice that you've edited your last post. I know some forums are a bit touchy about this, but you're welcome to bump your topic to give us an update, otherwise it won't show up in the recent posts list and we might not have noticed it.
So - only 29 servos to go eh?
-------------
|
| [top] |
|